Build your first Blueprint
Let's build an elementary Blueprint that
- Creates a new WordPress site
- Sets the site title to "My first Blueprint"
- Installs the Adventurer theme
- Installs the Hello Dolly plugin from the WordPress plugin directory
- Installs a custom plugin
- Changes the site content
1. Create a new WordPress site
Let's start by creating a blueprint.json file with the following contents:
{}
It may seem like nothing is happening, but this Blueprint already spins up a WordPress site with the latest major version.
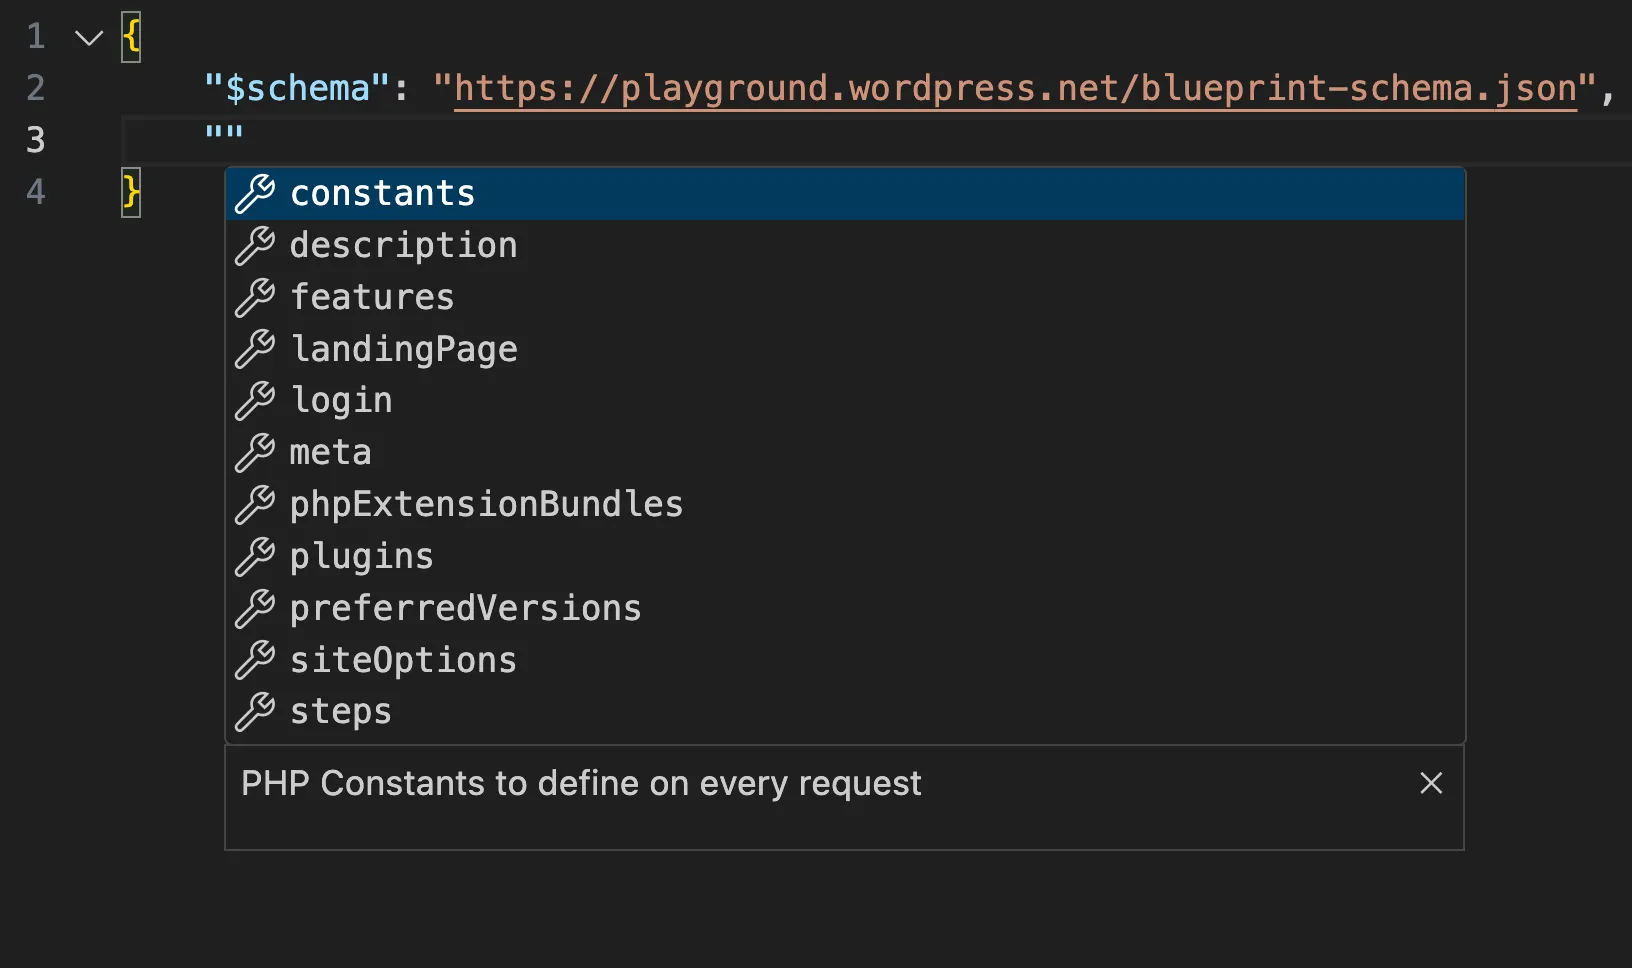
Autocomplete
If you use an IDE, like VS Code or PHPStorm, you can use the Blueprint JSON Schema for an autocompleted Blueprint development experience. Add the following line at the top of your blueprint.json file:
{
	"$schema": "https://playground.wordpress.net/blueprint-schema.json"
}
Here's what it looks like in VS Code:
2. Set the site title to "My first Blueprint"
Blueprints consist of a series of steps that define how to build a WordPress site. Before you write the first step, declare an empty list of steps:
{
	"$schema": "https://playground.wordpress.net/blueprint-schema.json",
	"steps": []
}
This Blueprint isn't very exciting—it creates the same default site as the empty Blueprint above. Let's do something about it!
WordPress stores the site title in the blogname option. Add your first step and set that option to "My first Blueprint":
{
	"$schema": "https://playground.wordpress.net/blueprint-schema.json",
	"steps": [
		{
			"step": "setSiteOptions",
			"options": {
				"blogname": "My first Blueprint"
			}
		}
	]
}
The setSiteOptions step specifies the site options in the WordPress database. The options object contains the key-value pairs to set. In this case, you changed the value of the blogname key to "My first Blueprint". You can read more about all available steps in the Blueprint Steps API Reference.
Shorthands
You can specify some steps using a shorthand syntax. For example, you could write the setSiteOptions step like this:
{
	"$schema": "https://playground.wordpress.net/blueprint-schema.json",
	"siteOptions": {
		"blogname": "My first Blueprint"
	}
}
The shorthand syntax and the step syntax correspond with each other. Every step specified with the shorthand syntax is automatically added at the beginning of the steps array in an arbitrary order. Which should you choose? Use shorthands when brevity is your main concern, use steps when you need more control over the order of execution.
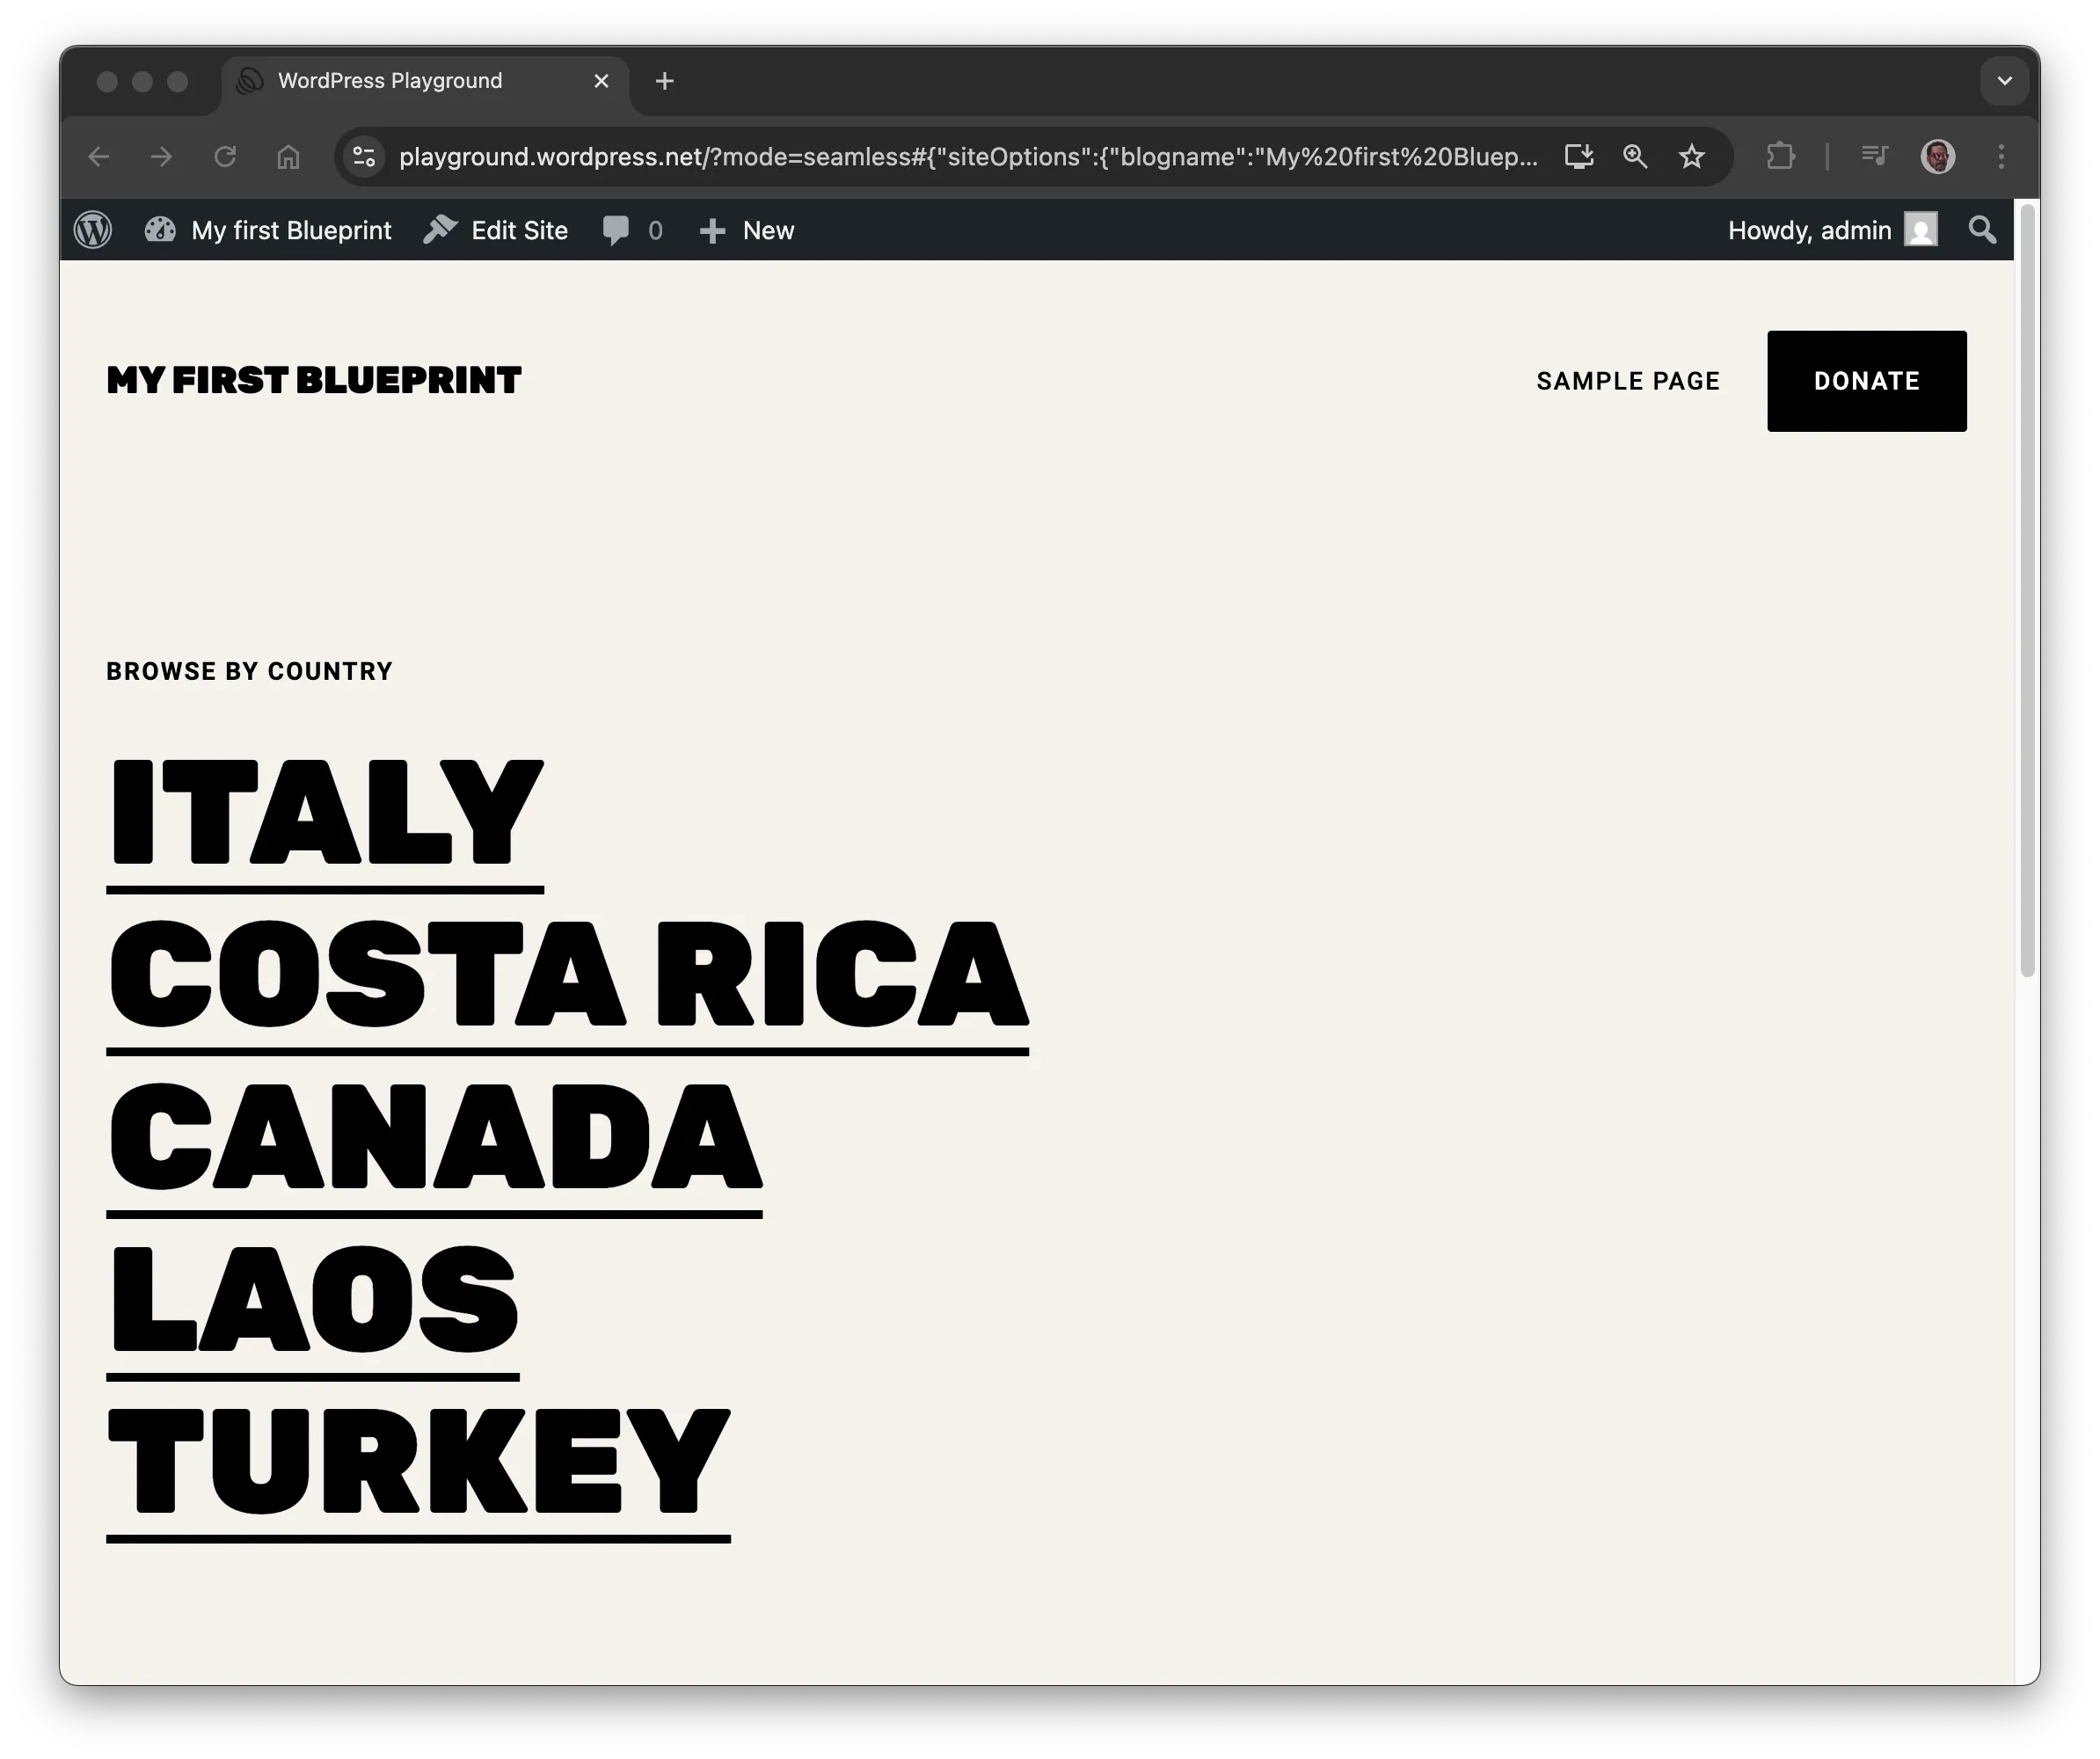
3. Install the Adventurer theme
Adventurer is an open-source theme available in the WordPress theme directory. Let's install it using the installTheme step:
{
	"siteOptions": {
		"blogname": "My first Blueprint"
	},
	"steps": [
		{
			"step": "installTheme",
			"themeData": {
				"resource": "wordpress.org/themes",
				"slug": "adventurer"
			}
		}
	]
}
The site should now look like the screenshot below:
Resources
The themeData defines a resource and references an external file required to complete the step. Playground supports different types of resources, including
url,wordpress.org/themes,wordpress.org/plugins,vfs(virtual file system), orliteral.
The example uses the wordpress.org/themes resource, which requires a slug identical to the one used in WordPress theme directory:
In this case, https://wordpress.org/themes/<slug>/ becomes https://wordpress.org/themes/adventurer/.
Learn more about the supported resources in the Blueprint Resources API Reference.
4. Install the Hello Dolly plugin
A classic WordPress plugin that displays random lyrics from the song "Hello, Dolly!" in the admin dashboard. Let's install it using the installPlugin step:
{
	"siteOptions": {
		"blogname": "My first Blueprint"
	},
	"steps": [
		{
			"step": "installTheme",
			"themeData": {
				"resource": "wordpress.org/themes",
				"slug": "adventurer"
			}
		},
		{
			"step": "installPlugin",
			"pluginData": {
				"resource": "wordpress.org/plugins",
				"slug": "hello-dolly"
			}
		}
	]
}
The Hello Dolly plugin is now installed and activated.
Like the themeData, the pluginData defines a reference to an external file required for the step. The example uses the wordpress.org/plugins resource to install the plugin with the matching slug from the WordPress plugin directory.
5. Install a custom plugin
Let's install a custom WordPress plugin that adds a message to the admin dashboard:
<?php
/*
Plugin Name: "Hello" on the Dashboard
Description: A custom plugin to showcase WordPress Blueprints
Version: 1.0
Author: WordPress Contributors
*/

function my_custom_plugin() {
    echo '<h1>Hello from My Custom Plugin!</h1>';
}

add_action('admin_notices', 'my_custom_plugin');
You can use the installPlugin, but that requires creating a ZIP file. Let's start with something different to see if the plugin works:
- Create a
wp-content/plugins/hello-from-the-dashboarddirectory using themkdirstep. - Write a
plugin.phpfile using thewriteFilestep. - Activate the plugin using the
activatePluginstep.
Here's what that looks like in a Blueprint:
{
	// ...
	"steps": [
		// ...
		{
			"step": "mkdir",
			"path": "/wordpress/wp-content/plugins/hello-from-the-dashboard"
		},
		{
			"step": "writeFile",
			"path": "/wordpress/wp-content/plugins/hello-from-the-dashboard/plugin.php",
			"data": "<?php\n/*\nPlugin Name: \"Hello\" on the Dashboard\nDescription: A custom plugin to showcase WordPress Blueprints\nVersion: 1.0\nAuthor: WordPress Contributors\n*/\n\nfunction my_custom_plugin() {\n    echo '<h1>Hello from My Custom Plugin!</h1>';\n}\n\nadd_action('admin_notices', 'my_custom_plugin');"
		},
		{
			"step": "activatePlugin",
			"pluginPath": "hello-from-the-dashboard/plugin.php"
		}
	]
}
The last thing to do is log the user in as an admin. You can do that with a shorthand of the login step:
{
	"login": true,
	"steps": {
		// ...
	}
}
Here's the complete Blueprint:
{
	"$schema": "https://playground.wordpress.net/blueprint-schema.json",
	"login": true,
	"siteOptions": {
		"blogname": "My first Blueprint"
	},
	"steps": [
		{
			"step": "installTheme",
			"themeData": {
				"resource": "wordpress.org/themes",
				"slug": "adventurer"
			}
		},
		{
			"step": "installPlugin",
			"pluginData": {
				"resource": "wordpress.org/plugins",
				"slug": "hello-dolly"
			}
		},
		{
			"step": "mkdir",
			"path": "/wordpress/wp-content/plugins/hello-from-the-dashboard"
		},
		{
			"step": "writeFile",
			"path": "/wordpress/wp-content/plugins/hello-from-the-dashboard/plugin.php",
			"data": "<?php\n/*\nPlugin Name: \"Hello\" on the Dashboard\nDescription: A custom plugin to showcase WordPress Blueprints\nVersion: 1.0\nAuthor: WordPress Contributors\n*/\n\nfunction my_custom_plugin() {\n    echo '<h1>Hello from My Custom Plugin!</h1>';\n}\n\nadd_action('admin_notices', 'my_custom_plugin');"
		},
		{
			"step": "activatePlugin",
			"pluginPath": "hello-from-the-dashboard/plugin.php"
		}
	]
}
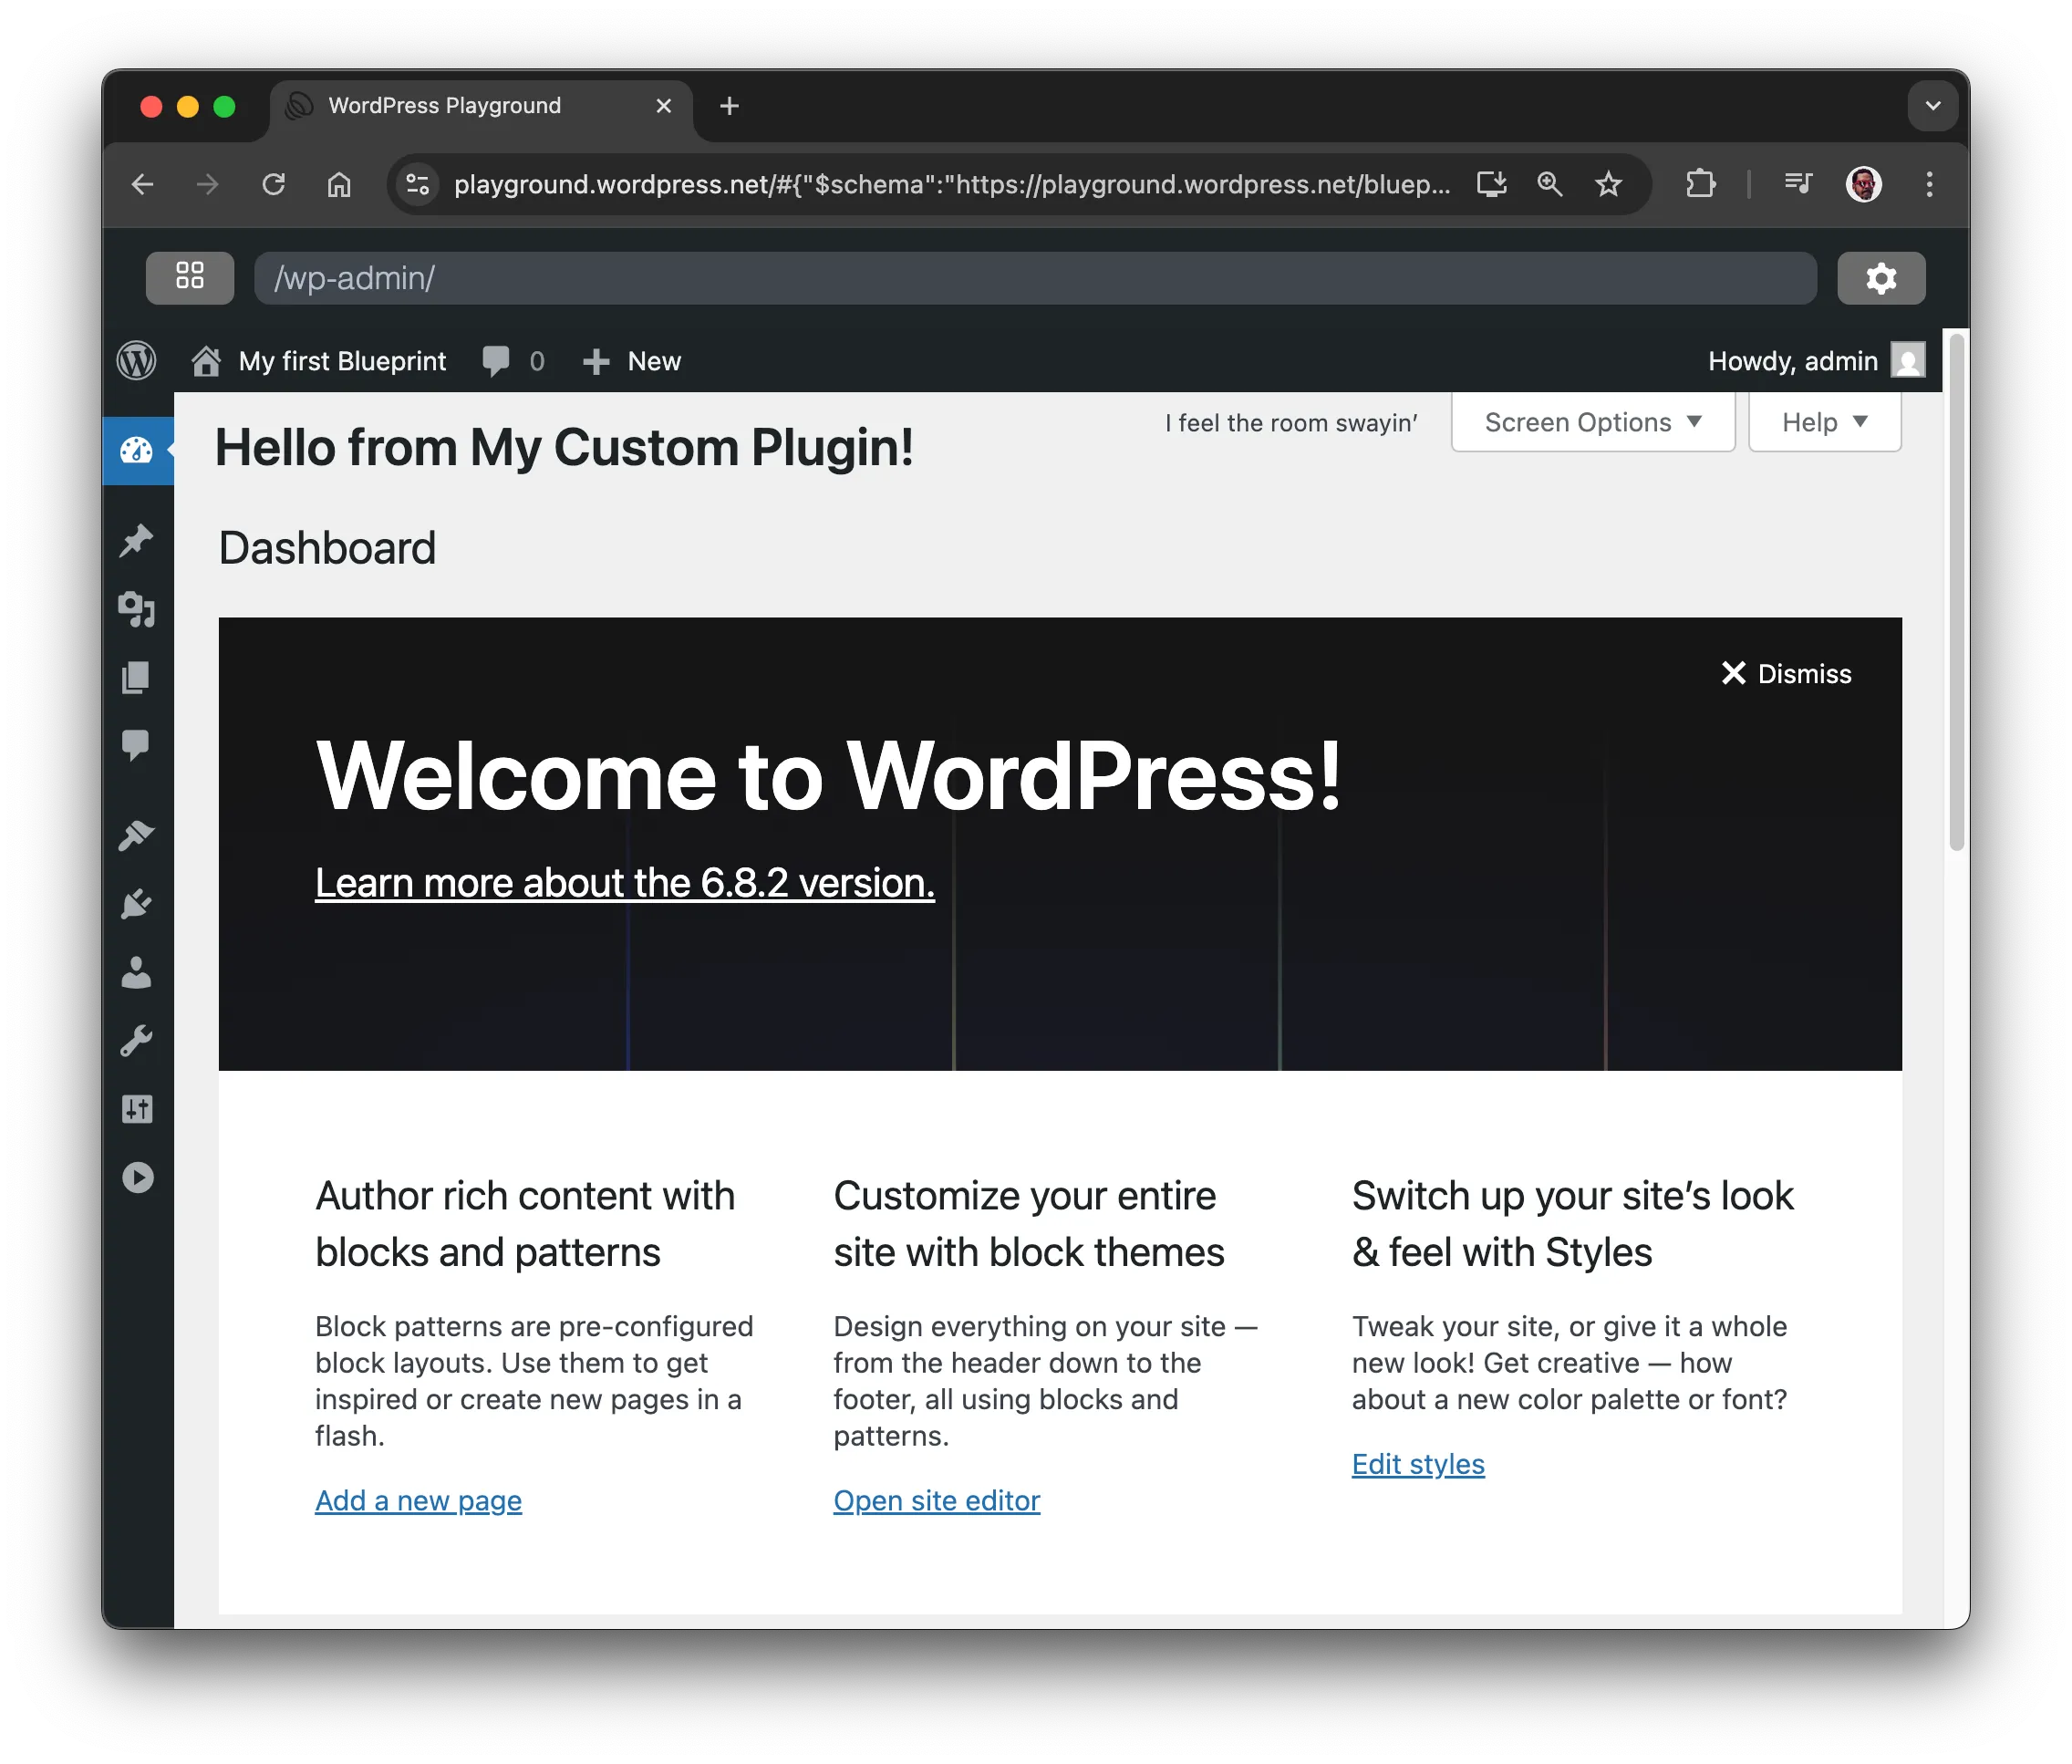
That's what it looks like when you navigate to the dashboard:
Create a plugin and zip it
Encoding PHP files as JSON can be useful for quick testing, but it's inconvenient and difficult to read. Instead, create a file with the plugin code, compress it, and use the ZIP file as the resource in the installPlugin step to install it (the path in the URL should match the one in your GitHub repository):
{
	"$schema": "https://playground.wordpress.net/blueprint-schema.json",
	"login": true,
	"siteOptions": {
		"blogname": "My first Blueprint"
	},
	"steps": [
		{
			"step": "installTheme",
			"themeData": {
				"resource": "wordpress.org/themes",
				"slug": "adventurer"
			}
		},
		{
			"step": "installPlugin",
			"pluginData": {
				"resource": "wordpress.org/plugins",
				"slug": "hello-dolly"
			}
		},
		{
			"step": "installPlugin",
			"pluginData": {
				"resource": "url",
				"url": "https://raw.githubusercontent.com/wordpress/blueprints/trunk/docs/assets/hello-from-the-dashboard.zip"
			}
		}
	]
}
You can shorten that Blueprint even more using the shorthand syntax:
{
	"$schema": "https://playground.wordpress.net/blueprint-schema.json",
	"login": true,
	"siteOptions": {
		"blogname": "My first Blueprint"
	},
	"plugins": ["hello-dolly", "https://raw.githubusercontent.com/wordpress/blueprints/trunk/docs/assets/hello-from-the-dashboard.zip"],
	"steps": [
		{
			"step": "installTheme",
			"themeData": {
				"resource": "wordpress.org/themes",
				"slug": "adventurer"
			}
		}
	]
}
6. Change the site content
Finally, let's delete the default content of the site and import a new one from a WordPress export file (WXR).
Delete the old content
There isn't a Blueprint step to delete the default content, but you can do that with a snippet of PHP code:
<?php
require '/wordpress/wp-load.php';

// Delete all posts and pages
$posts = get_posts(array(
    'numberposts' => -1,
    'post_type' => array('post', 'page'),
    'post_status' => 'any'
));

foreach ($posts as $post) {
    wp_delete_post($post->ID, true);
}
To run that code during the site setup, use the runPHP step:
{
	// ...
	"steps": [
		// ...
		{
			"step": "runPHP",
			"code": "<?php\nrequire '/wordpress/wp-load.php';\n\n$posts = get_posts(array(\n    'numberposts' => -1,\n    'post_type' => array('post', 'page'),\n    'post_status' => 'any'\n));\n\nforeach ($posts as $post) {\n    wp_delete_post($post->ID, true);\n}"
		}
	]
}
Import the new content
Let's use the importWxr step to import a WordPress export (WXR) file that helps test WordPress themes. The file is available in the WordPress/theme-test-data repository, and you can access it via its raw.githubusercontent.com address: https://raw.githubusercontent.com/WordPress/theme-test-data/master/themeunittestdata.wordpress.xml.
Here's what the final Blueprint looks like:
{
	"$schema": "https://playground.wordpress.net/blueprint-schema.json",
	"login": true,
	"siteOptions": {
		"blogname": "My first Blueprint"
	},
	"plugins": ["hello-dolly", "https://raw.githubusercontent.com/wordpress/blueprints/trunk/docs/assets/hello-from-the-dashboard.zip"],
	"steps": [
		{
			"step": "installTheme",
			"themeData": {
				"resource": "wordpress.org/themes",
				"slug": "adventurer"
			}
		},
		{
			"step": "runPHP",
			"code": "<?php\nrequire '/wordpress/wp-load.php';\n\n$posts = get_posts(array(\n    'numberposts' => -1,\n    'post_type' => array('post', 'page'),\n    'post_status' => 'any'\n));\n\nforeach ($posts as $post) {\n    wp_delete_post($post->ID, true);\n}"
		},
		{
			"step": "importWxr",
			"file": {
				"resource": "url",
				"url": "https://raw.githubusercontent.com/WordPress/theme-test-data/master/themeunittestdata.wordpress.xml"
			}
		}
	]
}
And that's it. Congratulations on creating your first Blueprint! 🥳