Gumawa ng Unang Blueprint
Gumawa tayo ng elementary na Blueprint na
- Gumagawa ng bagong WordPress site
- Nagse-set ng site title sa "My first Blueprint"
- Nag-i-install ng Adventurer theme
- Nag-i-install ng Hello Dolly plugin mula sa WordPress plugin directory
- Nag-i-install ng custom plugin
- Nagbabago ng site content
1. Gumawa ng bagong WordPress site
Simulan natin sa paggawa ng blueprint.json file na may sumusunod na content:
{}
Mukhang walang nangyayari, pero ang Blueprint na ito ay gumagawa na ng WordPress site na may latest major version.
Autocomplete
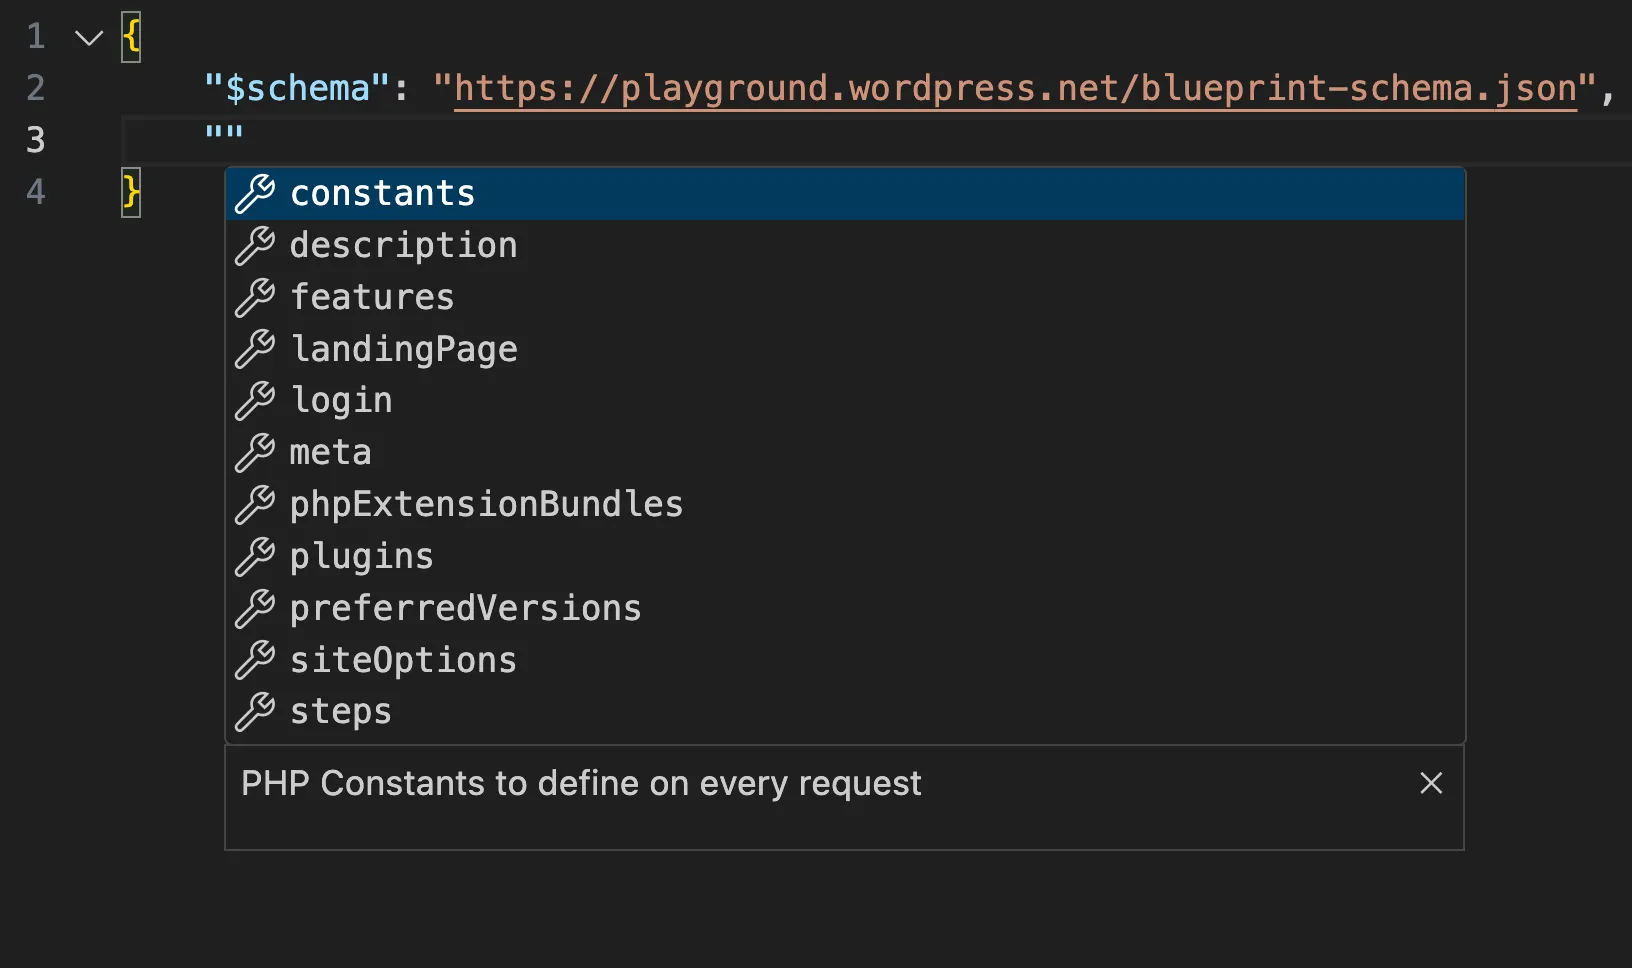
Kung gumagamit ka ng IDE, tulad ng VS Code o PHPStorm, maaari mong gamitin ang Blueprint JSON Schema para sa autocompleted na Blueprint development experience. Magdagdag ng sumusunod na line sa itaas ng iyong blueprint.json file:
{
	"$schema": "https://playground.wordpress.net/blueprint-schema.json"
}
Ganito ang itsura nito sa VS Code:
2. I-set ang site title sa "My first Blueprint"
Ang mga Blueprint ay binubuo ng serye ng mga step na nagde-define kung paano gumawa ng WordPress site. Bago ka sumulat ng unang step, mag-declare ng empty na list ng mga step:
{
	"$schema": "https://playground.wordpress.net/blueprint-schema.json",
	"steps": []
}
Ang Blueprint na ito ay hindi masyadong exciting—gumagawa ito ng parehong default site tulad ng empty na Blueprint sa itaas. Gumawa tayo ng something about it!
Ang WordPress ay nagse-store ng site title sa blogname option. Magdagdag ng iyong unang step at i-set ang option na iyon sa "My first Blueprint":
{
	"$schema": "https://playground.wordpress.net/blueprint-schema.json",
	"steps": [
		{
			"step": "setSiteOptions",
			"options": {
				"blogname": "My first Blueprint"
			}
		}
	]
}
Ang setSiteOptions step ay nagse-specify ng mga site options sa WordPress database. Ang options object ay naglalaman ng key-value pairs na i-set. Sa kasong ito, binago mo ang value ng blogname key sa "My first Blueprint". Maaari mong basahin ang tungkol sa lahat ng available na steps sa Blueprint Steps API Reference.
Mga Shorthand
Maaari mong i-specify ang ilang steps gamit ang shorthand syntax. Halimbawa, maaari mong isulat ang setSiteOptions step tulad nito:
{
	"$schema": "https://playground.wordpress.net/blueprint-schema.json",
	"siteOptions": {
		"blogname": "My first Blueprint"
	}
}
Ang shorthand syntax at ang step syntax ay tumutugma sa isa't isa. Bawat step na na-specify gamit ang shorthand syntax ay awtomatikong naa-add sa simula ng steps array sa arbitrary na order. Alin ang dapat mong piliin? Gamitin ang mga shorthand kapag ang brevity ay ang iyong pangunahing concern, gamitin ang mga steps kapag kailangan mo ng mas maraming control sa order ng execution.
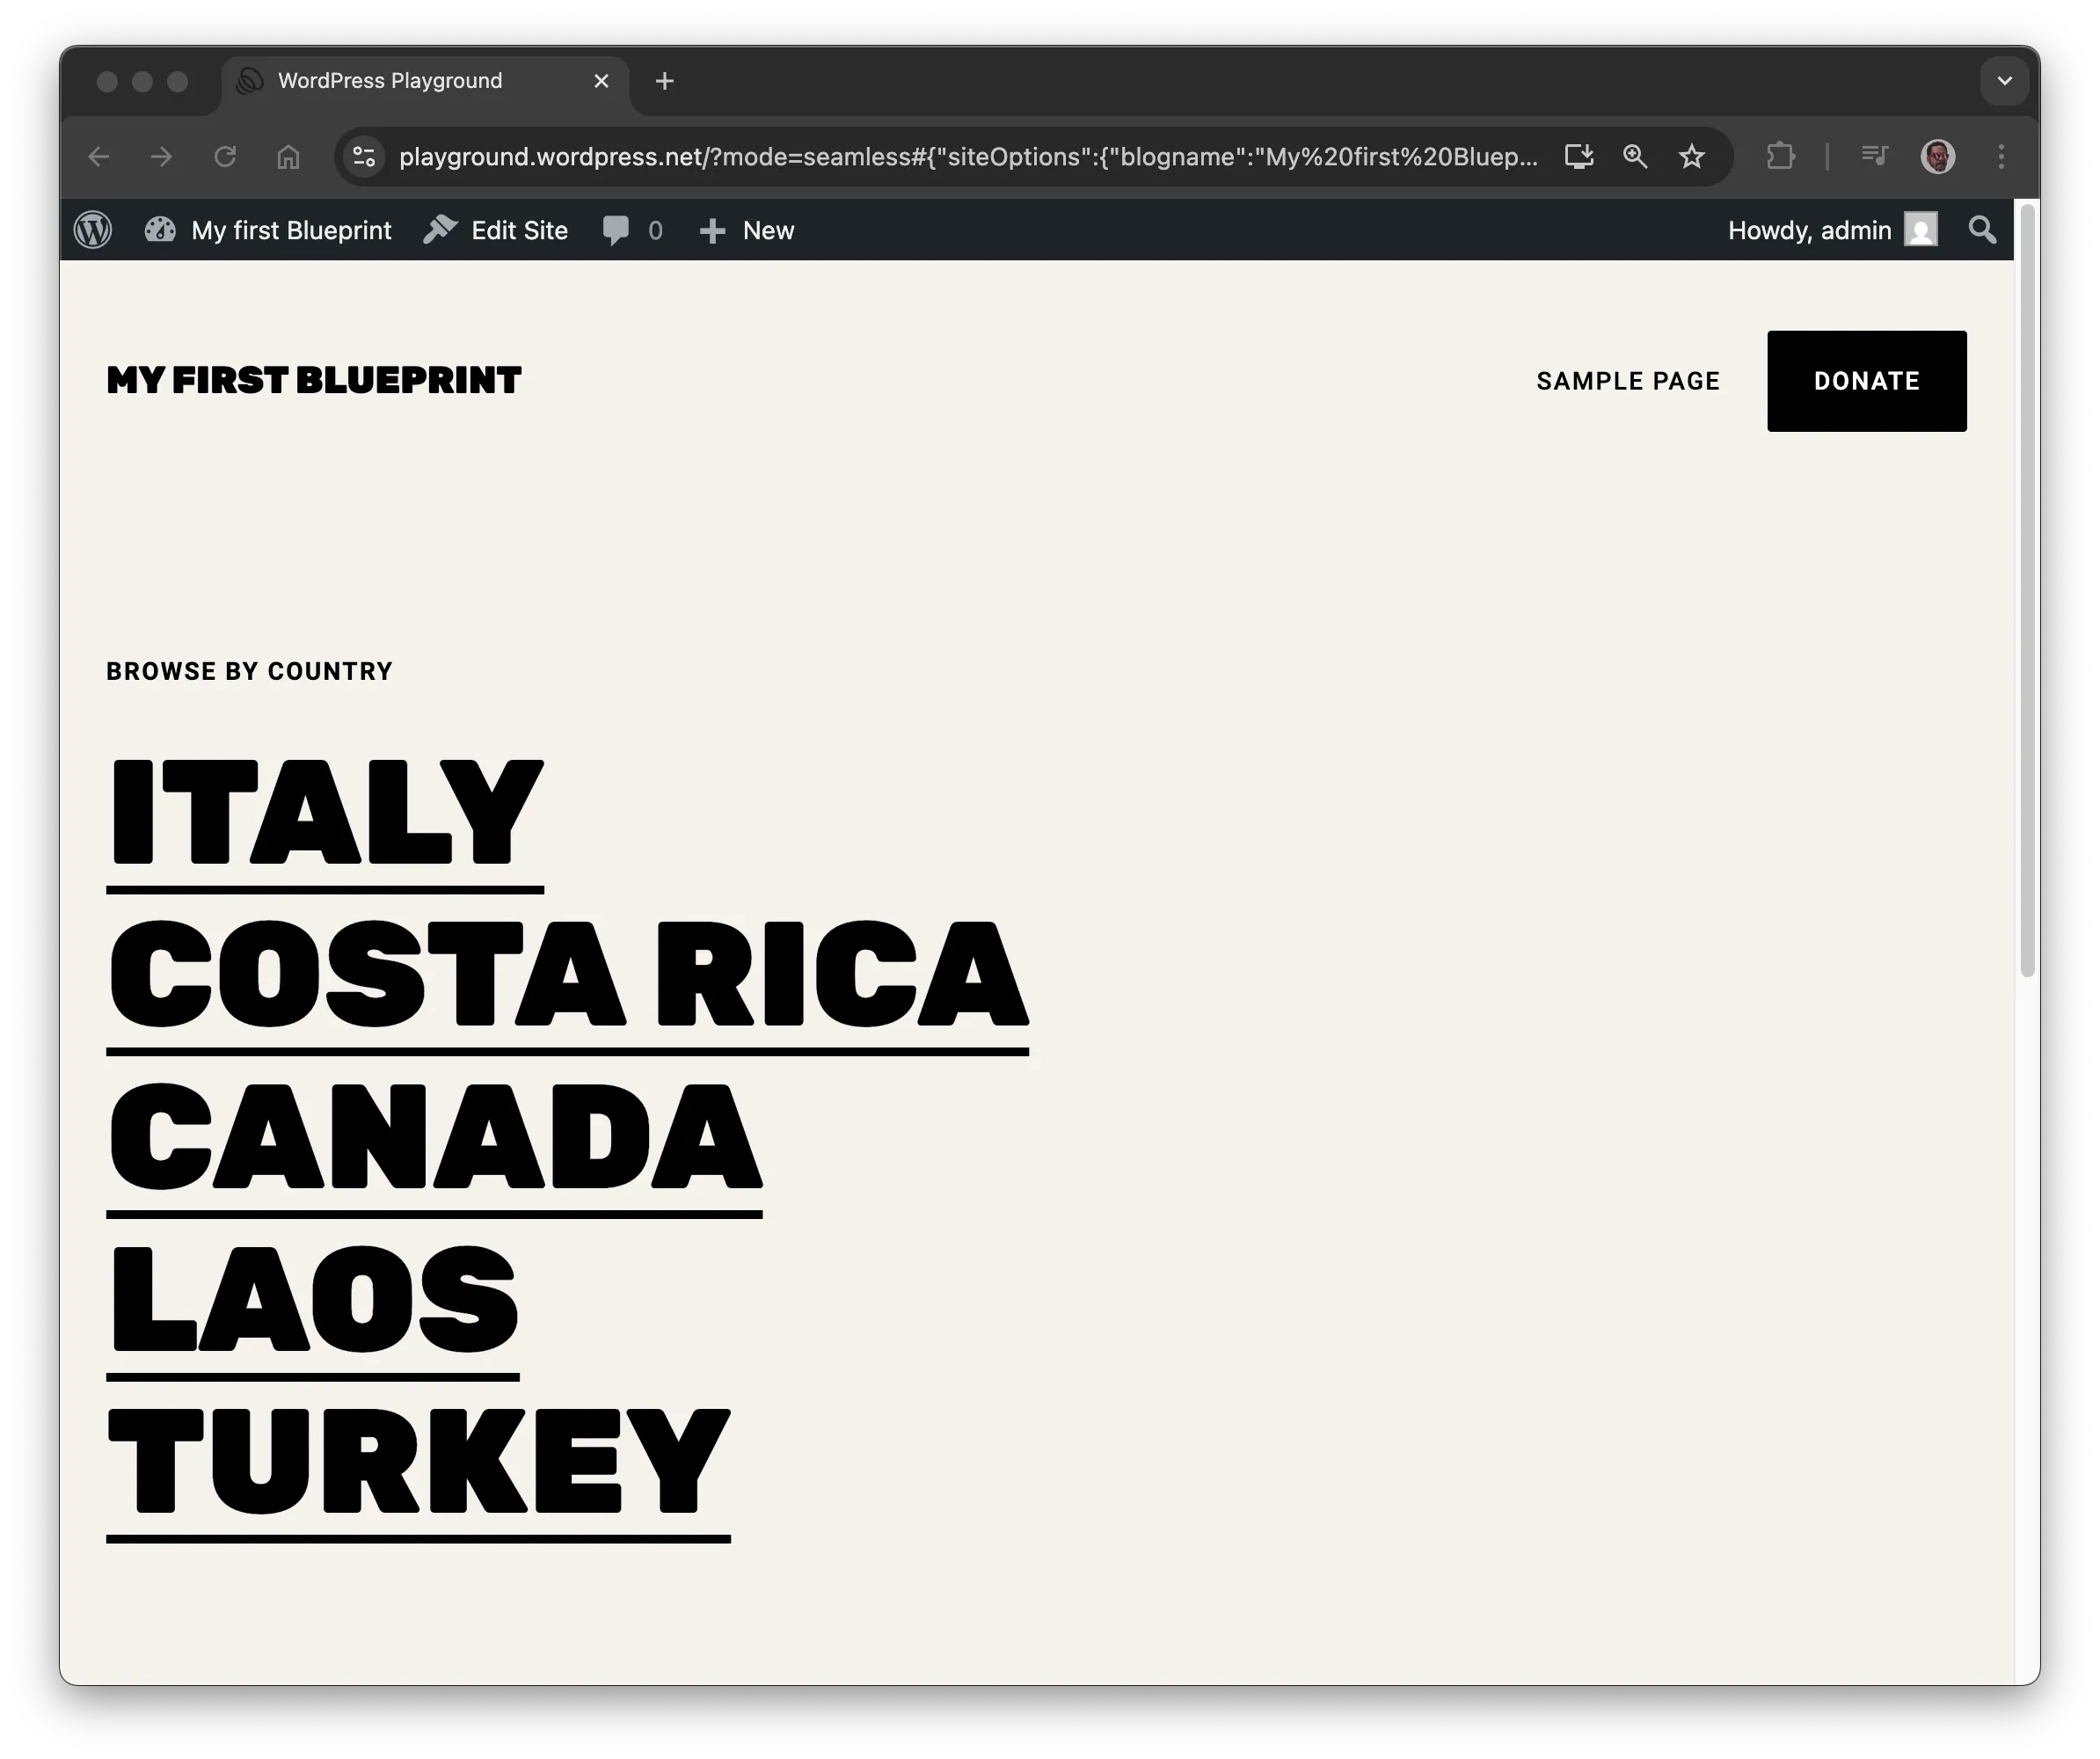
3. I-install ang Adventurer theme
Ang Adventurer ay isang open-source theme na available sa WordPress theme directory. I-install natin ito gamit ang installTheme step:
{
	"siteOptions": {
		"blogname": "My first Blueprint"
	},
	"steps": [
		{
			"step": "installTheme",
			"themeData": {
				"resource": "wordpress.org/themes",
				"slug": "adventurer"
			}
		}
	]
}
Ang site ay dapat na mukhang ganito sa screenshot sa ibaba:
Mga Resource
Ang themeData ay nagde-define ng resource at nagre-reference ng external file na kailangan para makumpleto ang step. Ang Playground ay sumusuporta sa iba't ibang uri ng resources, kasama ang
url,wordpress.org/themes,wordpress.org/plugins,vfs(virtual file system), oliteral.
Ang example ay gumagamit ng wordpress.org/themes resource, na nangangailangan ng slug na identical sa ginagamit sa WordPress theme directory:
Sa kasong ito, https://wordpress.org/themes/<slug>/ ay nagiging https://wordpress.org/themes/adventurer/.
Matuto pa tungkol sa mga supported na resources sa Blueprint Resources API Reference.
4. I-install ang Hello Dolly plugin
Isang classic na WordPress plugin na nagdi-display ng random na lyrics mula sa kantang "Hello, Dolly!" sa admin dashboard. I-install natin ito gamit ang installPlugin step:
{
	"siteOptions": {
		"blogname": "My first Blueprint"
	},
	"steps": [
		{
			"step": "installTheme",
			"themeData": {
				"resource": "wordpress.org/themes",
				"slug": "adventurer"
			}
		},
		{
			"step": "installPlugin",
			"pluginData": {
				"resource": "wordpress.org/plugins",
				"slug": "hello-dolly"
			}
		}
	]
}
Ang Hello Dolly plugin ay na-install na at na-activate.
Tulad ng themeData, ang pluginData ay nagde-define ng reference sa external file na kailangan para sa step. Ang example ay gumagamit ng wordpress.org/plugins resource para i-install ang plugin na may matching na slug mula sa WordPress plugin directory.
5. I-install ang custom plugin
I-install natin ang custom na WordPress plugin na nagda-dagdag ng message sa admin dashboard:
<?php
/*
Plugin Name: "Hello" on the Dashboard
Description: A custom plugin to showcase WordPress Blueprints
Version: 1.0
Author: WordPress Contributors
*/

function my_custom_plugin() {
    echo '<h1>Hello from My Custom Plugin!</h1>';
}

add_action('admin_notices', 'my_custom_plugin');
Maaari mong gamitin ang installPlugin, pero iyon ay nangangailangan ng paggawa ng ZIP file. Simulan natin sa ibang bagay para makita kung gumagana ang plugin:
- Gumawa ng
wp-content/plugins/hello-from-the-dashboarddirectory gamit angmkdirstep. - Sumulat ng
plugin.phpfile gamit angwriteFilestep. - I-activate ang plugin gamit ang
activatePluginstep.
Ganito ang itsura nito sa isang Blueprint:
{
	// ...
	"steps": [
		// ...
		{
			"step": "mkdir",
			"path": "/wordpress/wp-content/plugins/hello-from-the-dashboard"
		},
		{
			"step": "writeFile",
			"path": "/wordpress/wp-content/plugins/hello-from-the-dashboard/plugin.php",
			"data": "<?php\n/*\nPlugin Name: \"Hello\" on the Dashboard\nDescription: A custom plugin to showcase WordPress Blueprints\nVersion: 1.0\nAuthor: WordPress Contributors\n*/\n\nfunction my_custom_plugin() {\n    echo '<h1>Hello from My Custom Plugin!</h1>';\n}\n\nadd_action('admin_notices', 'my_custom_plugin');"
		},
		{
			"step": "activatePlugin",
			"pluginPath": "hello-from-the-dashboard/plugin.php"
		}
	]
}
Ang huling bagay na dapat gawin ay i-log ang user bilang admin. Maaari mong gawin iyon gamit ang shorthand ng login step:
{
	"login": true,
	"steps": {
		// ...
	}
}
Narito ang kumpletong Blueprint:
{
	"$schema": "https://playground.wordpress.net/blueprint-schema.json",
	"login": true,
	"siteOptions": {
		"blogname": "My first Blueprint"
	},
	"steps": [
		{
			"step": "installTheme",
			"themeData": {
				"resource": "wordpress.org/themes",
				"slug": "adventurer"
			}
		},
		{
			"step": "installPlugin",
			"pluginData": {
				"resource": "wordpress.org/plugins",
				"slug": "hello-dolly"
			}
		},
		{
			"step": "mkdir",
			"path": "/wordpress/wp-content/plugins/hello-from-the-dashboard"
		},
		{
			"step": "writeFile",
			"path": "/wordpress/wp-content/plugins/hello-from-the-dashboard/plugin.php",
			"data": "<?php\n/*\nPlugin Name: \"Hello\" on the Dashboard\nDescription: A custom plugin to showcase WordPress Blueprints\nVersion: 1.0\nAuthor: WordPress Contributors\n*/\n\nfunction my_custom_plugin() {\n    echo '<h1>Hello from My Custom Plugin!</h1>';\n}\n\nadd_action('admin_notices', 'my_custom_plugin');"
		},
		{
			"step": "activatePlugin",
			"pluginPath": "hello-from-the-dashboard/plugin.php"
		}
	]
}
Ganito ang itsura nito kapag nag-navigate ka sa dashboard:
Gumawa ng plugin at i-zip ito
Ang pag-encode ng PHP files bilang JSON ay maaaring maging useful para sa quick testing, pero ito ay inconvenient at mahirap basahin. Sa halip, gumawa ng file na may plugin code, i-compress ito, at gamitin ang ZIP file bilang resource sa installPlugin step para i-install ito (ang path sa URL ay dapat tumugma sa nasa iyong GitHub repository):
{
	"$schema": "https://playground.wordpress.net/blueprint-schema.json",
	"login": true,
	"siteOptions": {
		"blogname": "My first Blueprint"
	},
	"steps": [
		{
			"step": "installTheme",
			"themeData": {
				"resource": "wordpress.org/themes",
				"slug": "adventurer"
			}
		},
		{
			"step": "installPlugin",
			"pluginData": {
				"resource": "wordpress.org/plugins",
				"slug": "hello-dolly"
			}
		},
		{
			"step": "installPlugin",
			"pluginData": {
				"resource": "url",
				"url": "https://raw.githubusercontent.com/wordpress/blueprints/trunk/docs/assets/hello-from-the-dashboard.zip"
			}
		}
	]
}
Maaari mong paikliin ang Blueprint na iyon gamit ang shorthand syntax:
{
	"$schema": "https://playground.wordpress.net/blueprint-schema.json",
	"login": true,
	"siteOptions": {
		"blogname": "My first Blueprint"
	},
	"plugins": ["hello-dolly", "https://raw.githubusercontent.com/wordpress/blueprints/trunk/docs/assets/hello-from-the-dashboard.zip"],
	"steps": [
		{
			"step": "installTheme",
			"themeData": {
				"resource": "wordpress.org/themes",
				"slug": "adventurer"
			}
		}
	]
}
6. Baguhin ang site content
Sa wakas, burahin natin ang default content ng site at mag-import ng bago mula sa WordPress export file (WXR).
Burahin ang lumang content
Walang Blueprint step para burahin ang default content, pero maaari mong gawin iyon gamit ang snippet ng PHP code:
<?php
require '/wordpress/wp-load.php';

// Delete all posts and pages
$posts = get_posts(array(
    'numberposts' => -1,
    'post_type' => array('post', 'page'),
    'post_status' => 'any'
));

foreach ($posts as $post) {
    wp_delete_post($post->ID, true);
}
Para patakbuhin ang code na iyon habang nagse-setup ng site, gamitin ang runPHP step:
{
	// ...
	"steps": [
		// ...
		{
			"step": "runPHP",
			"code": "<?php\nrequire '/wordpress/wp-load.php';\n\n$posts = get_posts(array(\n    'numberposts' => -1,\n    'post_type' => array('post', 'page'),\n    'post_status' => 'any'\n));\n\nforeach ($posts as $post) {\n    wp_delete_post($post->ID, true);\n}"
		}
	]
}
I-import ang bagong content
Gamitin natin ang importWxr step para mag-import ng WordPress export (WXR) file na tumutulong mag-test ng WordPress themes. Ang file ay available sa WordPress/theme-test-data repository, at maaari mong ma-access ito sa pamamagitan ng raw.githubusercontent.com address: https://raw.githubusercontent.com/WordPress/theme-test-data/master/themeunittestdata.wordpress.xml.
Ganito ang itsura ng final na Blueprint:
{
	"$schema": "https://playground.wordpress.net/blueprint-schema.json",
	"login": true,
	"siteOptions": {
		"blogname": "My first Blueprint"
	},
	"plugins": ["hello-dolly", "https://raw.githubusercontent.com/wordpress/blueprints/trunk/docs/assets/hello-from-the-dashboard.zip"],
	"steps": [
		{
			"step": "installTheme",
			"themeData": {
				"resource": "wordpress.org/themes",
				"slug": "adventurer"
			}
		},
		{
			"step": "runPHP",
			"code": "<?php\nrequire '/wordpress/wp-load.php';\n\n$posts = get_posts(array(\n    'numberposts' => -1,\n    'post_type' => array('post', 'page'),\n    'post_status' => 'any'\n));\n\nforeach ($posts as $post) {\n    wp_delete_post($post->ID, true);\n}"
		},
		{
			"step": "importWxr",
			"file": {
				"resource": "url",
				"url": "https://raw.githubusercontent.com/WordPress/theme-test-data/master/themeunittestdata.wordpress.xml"
			}
		}
	]
}
At iyon na iyon. Binabati kita sa paggawa ng iyong unang Blueprint! 🥳