最初のブループリントを作成する
基本的なブループリントを作成してみましょう
- 新しい WordPress サイトを作成する
- サイトのタイトルを「私の最初のブループリント」に設定する
- Adventurer テーマをインストールする
- WordPress プラグインディレクトリから Hello Dolly プラグインをインストールする
- カスタムプラグインをインストールする
- サイトコンテンツを変更する
1. 新しい WordPress サイトを作成する
まず、次の内容の blueprint.json ファイルを作成しましょう。
{}
何も起こっていないように見えるかもしれませんが、このブループリントではすでに最新のメジャー バージョンで WordPress サイトが起動しています。
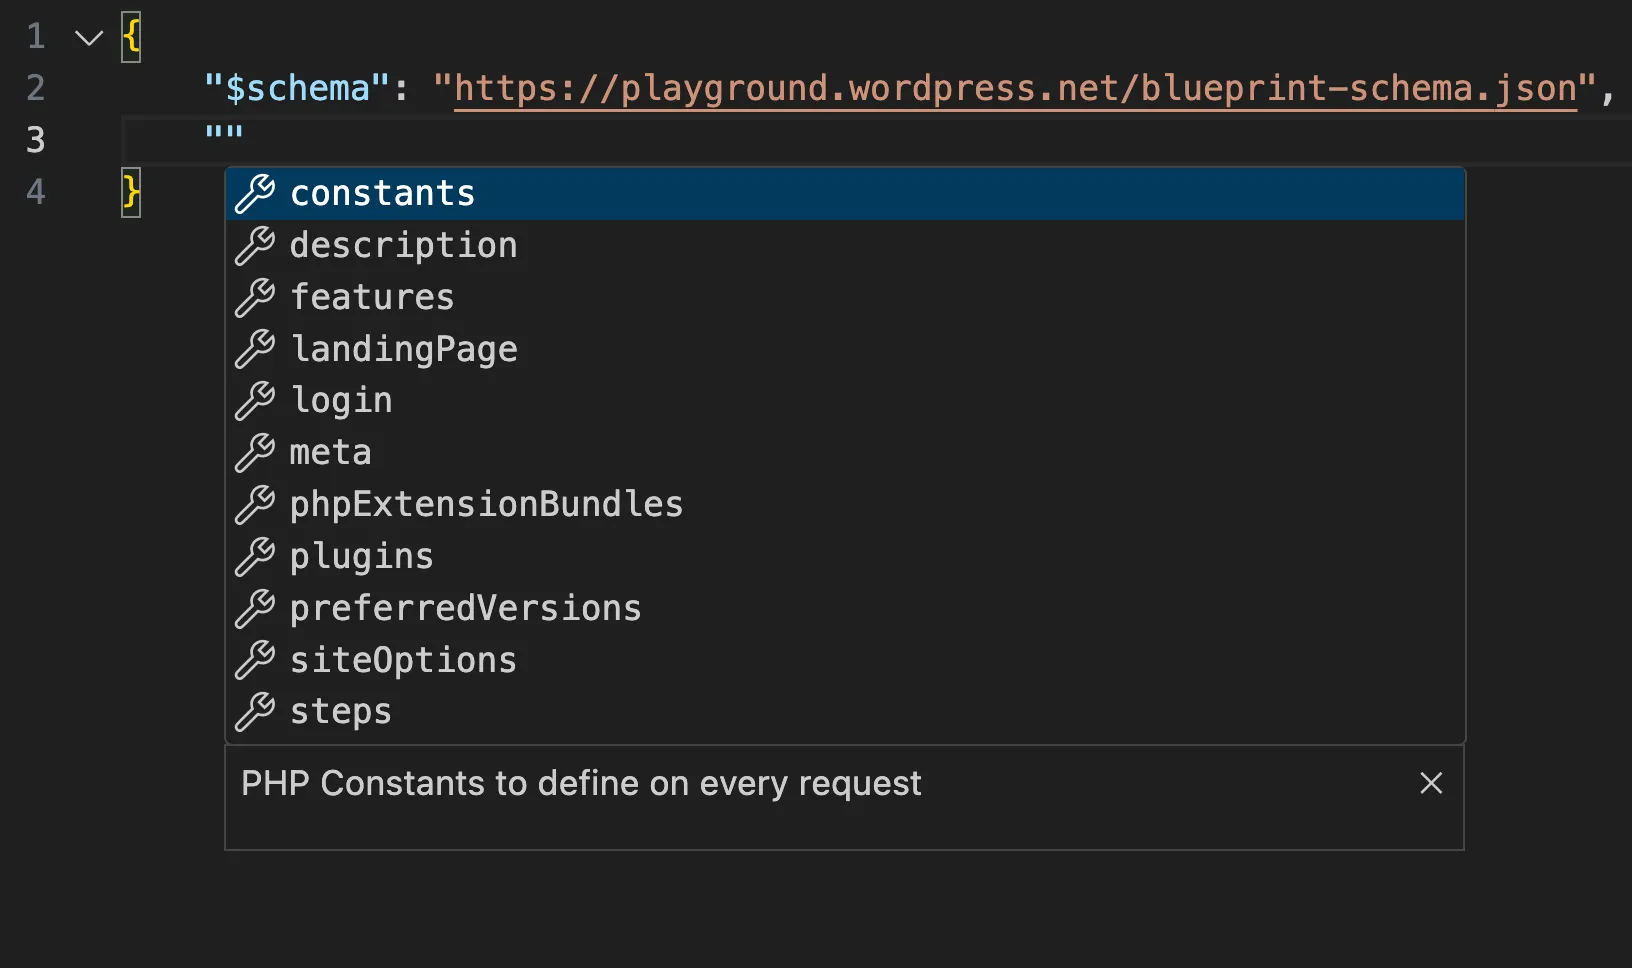
オートコンプリート
VS Code や PHPStorm などの IDE をご利用の場合は、Blueprint JSON Schemaを使用して、自動補完機能を備えたブループリント開発環境を構築できます。blueprint.jsonファイルの先頭に次の行を追加してください。
{
	"$schema": "https://playground.wordpress.net/blueprint-schema.json"
}
VS Code では次のようになります。
2. サイトのタイトルを「My first Blueprint」に設定する
ブループリントは、WordPress サイトの構築方法を定義する一連のステップで構成されています。最初のステップを記述する前に、空のステップリストを宣言します。
{
	"$schema": "https://playground.wordpress.net/blueprint-schema.json",
	"steps": []
}
このブループリントはあまり面白くありません。上の空のブループリントと同じデフォルトのサイトを作成してしまうからです。何か対策を講じてみましょう!
WordPress はサイトのタイトルを blogname オプションに保存します。最初のステップを追加し、そのオプションを「My first Blueprint」に設定します。
{
	"$schema": "https://playground.wordpress.net/blueprint-schema.json",
	"steps": [
		{
			"step": "setSiteOptions",
			"options": {
				"blogname": "私の最初のブループリント"
			}
		}
	]
}
setSiteOptions ステップ は、WordPress データベース内のサイトオプションを指定します。options オブジェクトには、設定するキーと値のペアが含まれています。この例では、blogname キーの値を「 My first Blueprint 」に変更しました。利用可能なすべてのステップの詳細については、Blueprint ステップ API リファレンス をご覧ください。
ショートハンド
いくつかのステップは短縮構文を使って指定できます。例えば、setSiteOptions ステップは次のように記述できます。
{
	"$schema": "https://playground.wordpress.net/blueprint-schema.json",
	"siteOptions": {
		"blogname": "私の最初のブループリント"
	}
}
ショートハンド構文とステップ構文は互いに対応しています。ショートハンド構文で指定されたすべてのステップは、任意の順序で steps 配列の先頭に自動的に追加されます。どちらを選ぶべきでしょうか?簡潔さを重視する場合はショートハンド構文を使用し、実行順序をより細かく制御する必要がある場合はステップ構文を使用します。
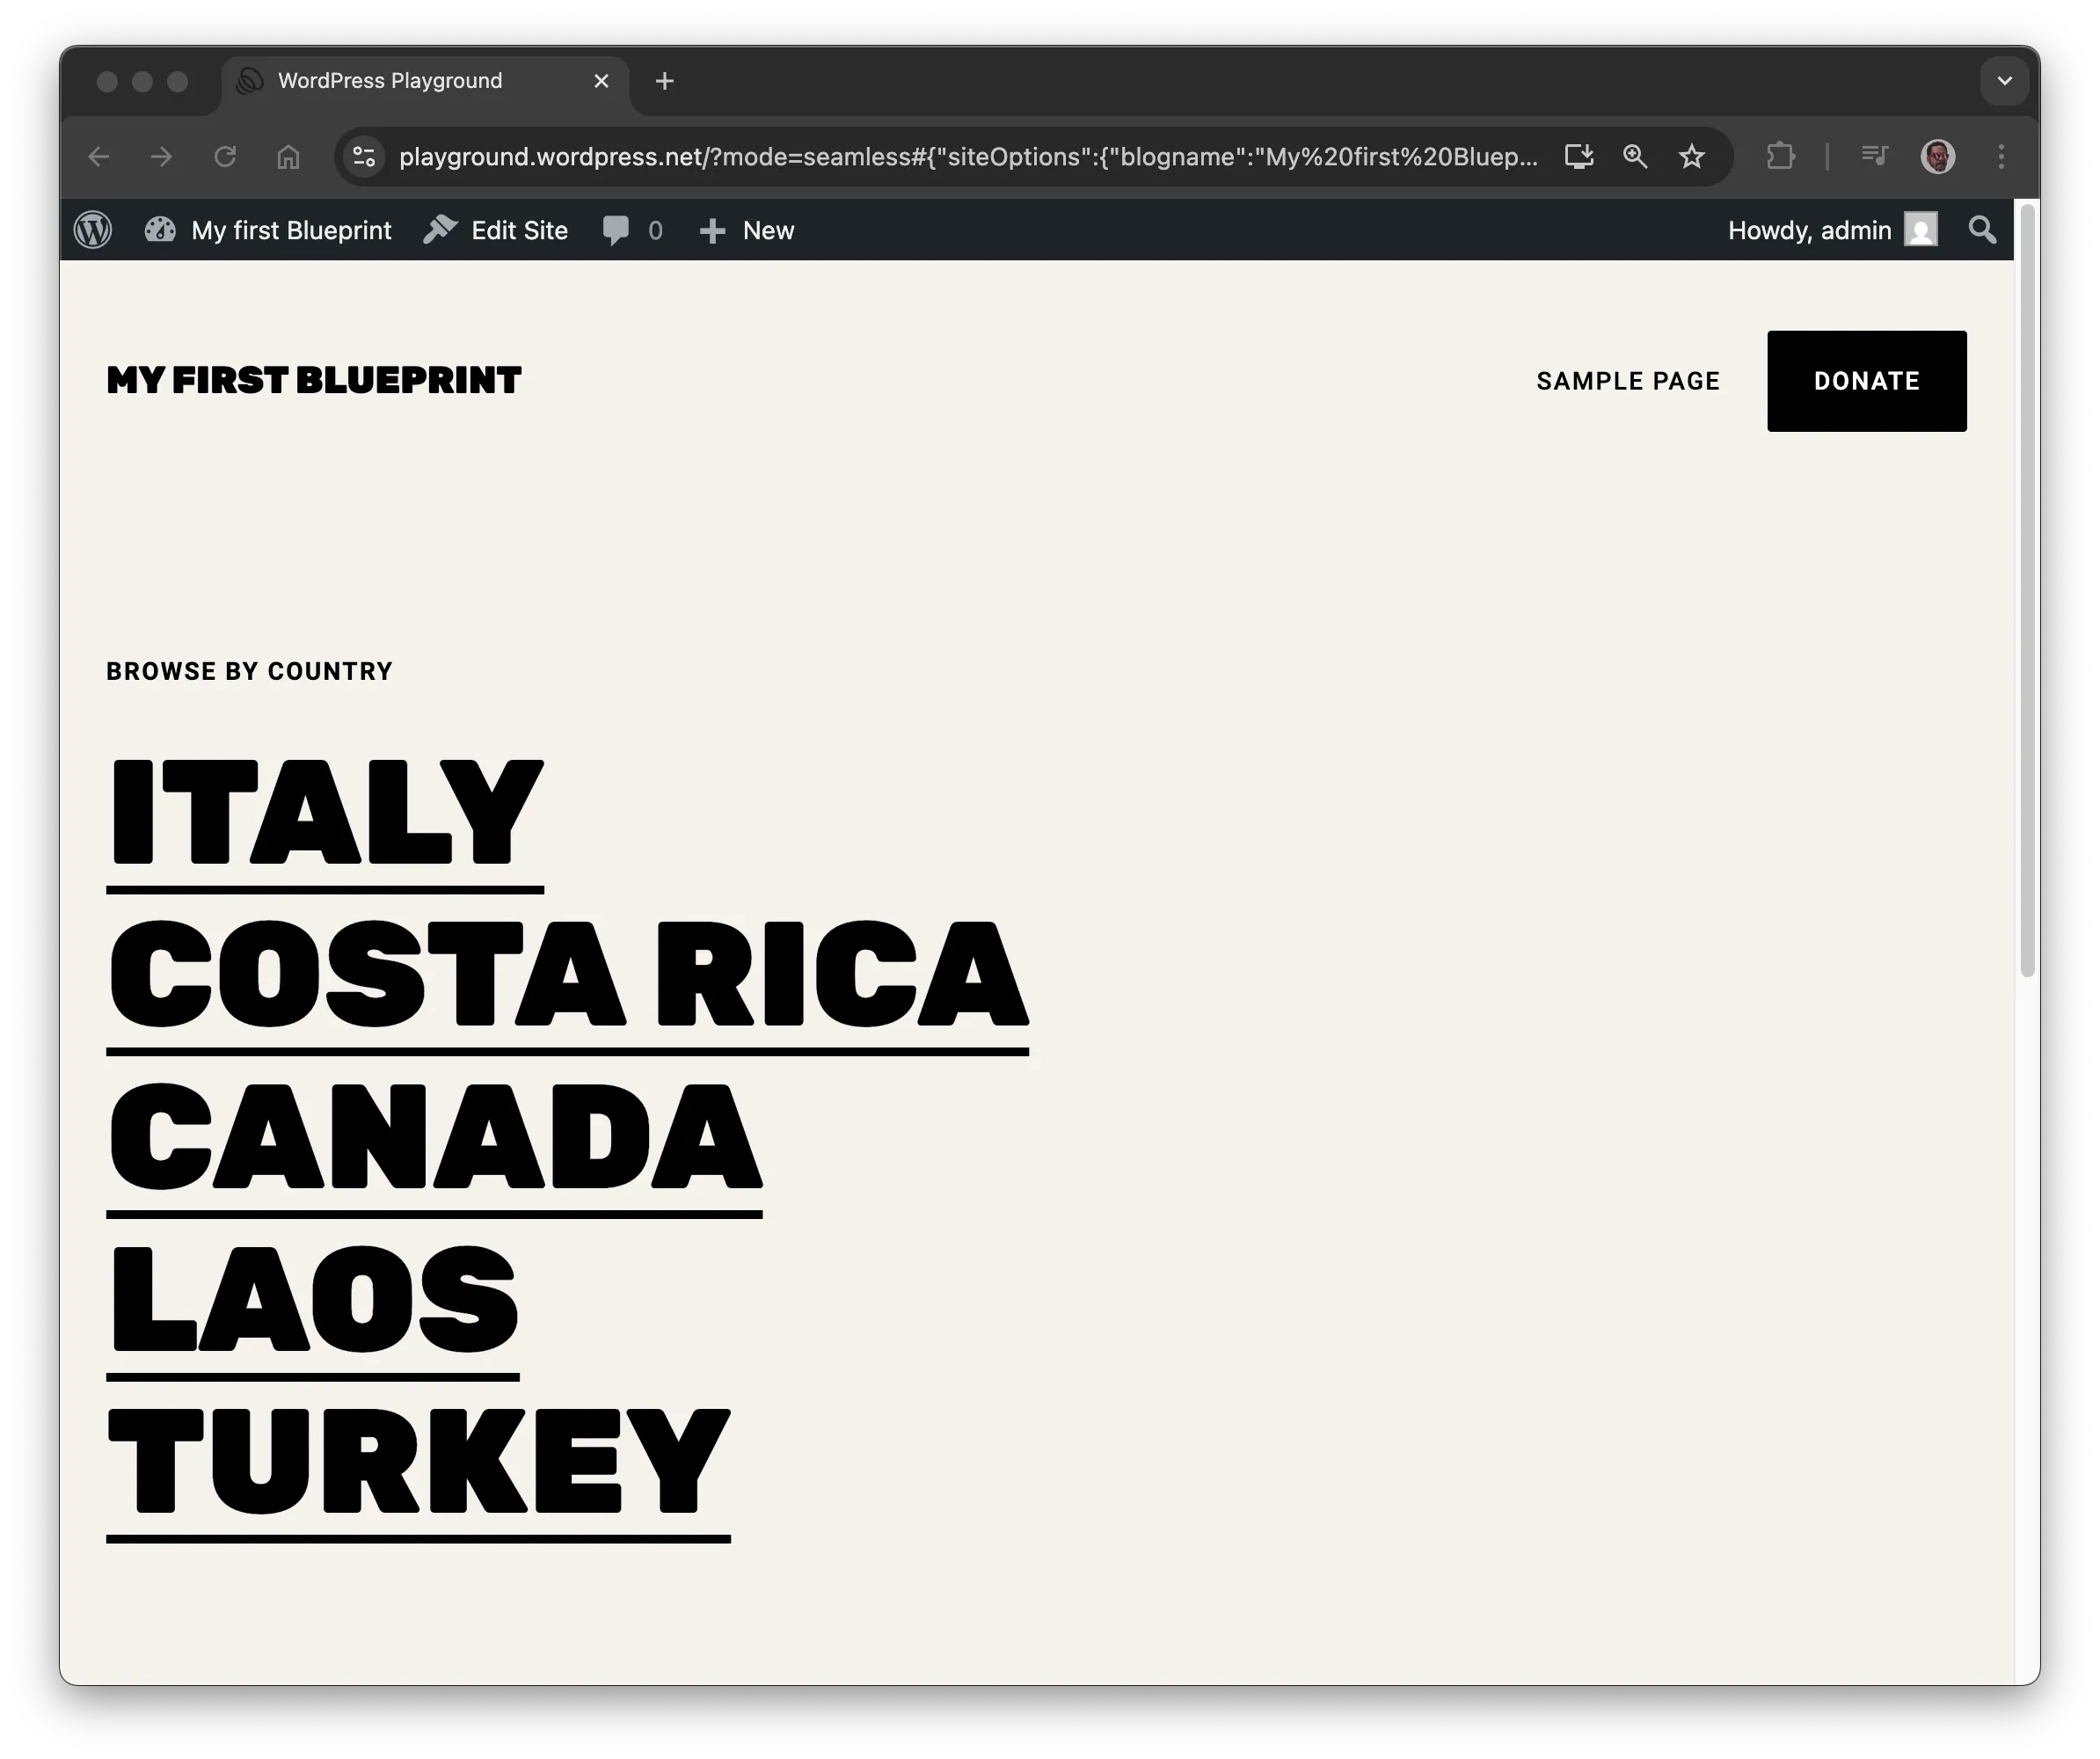
3. Adventurerテーマをインストールする
Adventurer はオープンソースのテーマです。 WordPress テーマディレクトリで入手可能。installThemeステップを使ってインストールしましょう。
{
	"siteOptions": {
		"blogname": "私の最初のブループリント"
	},
	"steps": [
		{
			"step": "installTheme",
			"themeData": {
				"resource": "wordpress.org/themes",
				"slug": "adventurer"
			}
		}
	]
}
サイトは以下のスクリーンショットのようになるはずです。
リソース
themeData は リソース を定義し、ステップを完了するために必要な外部ファイルを参照します。Playground は、次のようなさまざまな種類のリソースをサポートしています。
url,wordpress.org/themes,wordpress.org/plugins,vfs(仮想的なファイルシステム), またはliteral.
この例では、wordpress.org/themes リソースが使用されています。これには、WordPress テーマ ディレクトリで使用されているものと同じ slug が必要です。
この場合、https://wordpress.org/themes/<slug>/ は https://wordpress.org/themes/adventurer/ になります。
サポートされているリソースの詳細については、Blueprint リソース API リファレンスを参照してください。
4. Hello Dollyプラグインをインストールする
管理ダッシュボードに「Hello, Dolly!」の歌詞をランダムに表示する定番の WordPress プラグインです。installPlugin ステップを使ってインストールしてみましょう。
{
	"siteOptions": {
		"blogname": "私の最初のブループリント"
	},
	"steps": [
		{
			"step": "installTheme",
			"themeData": {
				"resource": "wordpress.org/themes",
				"slug": "adventurer"
			}
		},
		{
			"step": "installPlugin",
			"pluginData": {
				"resource": "wordpress.org/plugins",
				"slug": "hello-dolly"
			}
		}
	]
}
Hello Dolly プラグインがインストールされ、有効化されました。
themeData と同様に、pluginData はステップに必要な外部ファイルへの参照を定義します。この例では、wordpress.org/plugins リソースを使用して、WordPress プラグインディレクトリから一致する slug を持つプラグインをインストールします。
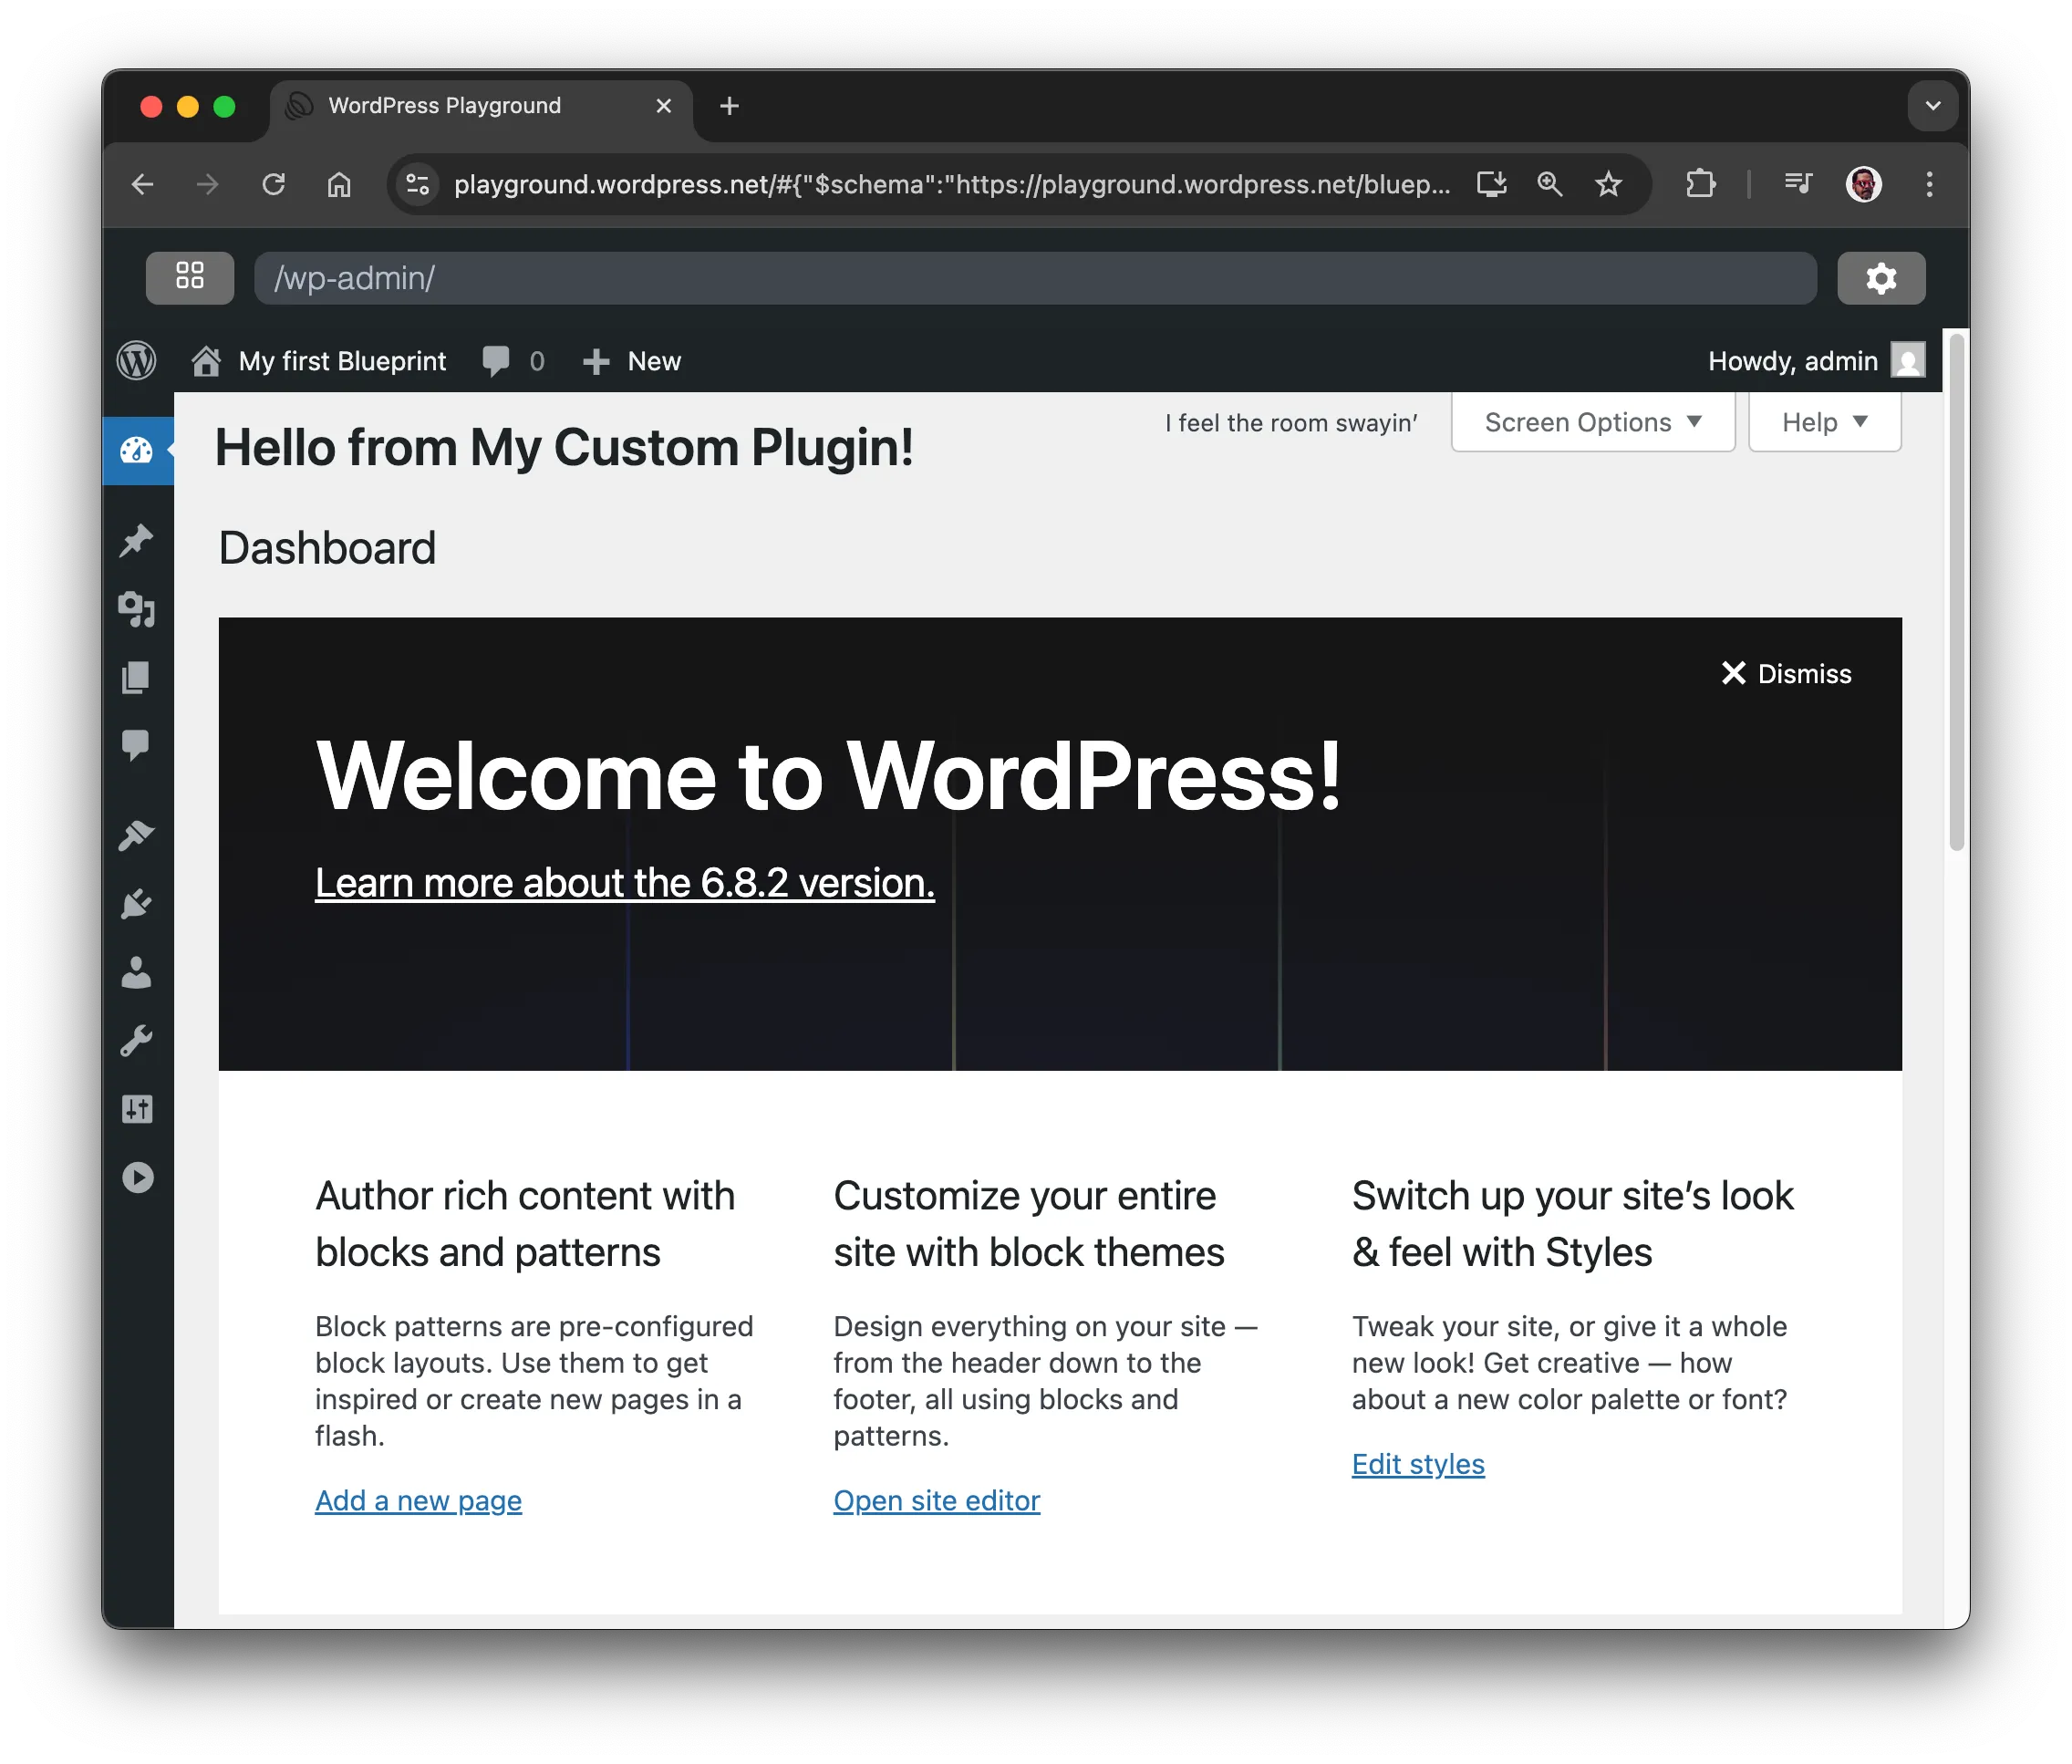
5. カスタムプラグインをインストールする
管理ダッシュボードにメッセージを追加するカスタム WordPress プラグインをインストールしましょう。
<?php
/*
Plugin Name: "Hello" on the Dashboard
Description: A custom plugin to showcase WordPress Blueprints
Version: 1.0
Author: WordPress Contributors
*/

function my_custom_plugin() {
    echo '<h1>Hello from My Custom Plugin!</h1>';
}

add_action('admin_notices', 'my_custom_plugin');
installPlugin を使うこともできますが、ZIP ファイルを作成する必要�があります。まずは別の方法でプラグインが動作するか確認してみましょう。
mkdirステップを使用して、wp-content/plugins/hello-from-the-dashboardディレクトリを作成します。writeFileステップを使用して、plugin.phpファイルを作成します。activatePluginステップを使用して、プラグインを有効化します。
ブループリントでは次のようになります。
{
	// ...
	"steps": [
		// ...
		{
			"step": "mkdir",
			"path": "/wordpress/wp-content/plugins/hello-from-the-dashboard"
		},
		{
			"step": "writeFile",
			"path": "/wordpress/wp-content/plugins/hello-from-the-dashboard/plugin.php",
			"data": "<?php\n/*\nPlugin Name: \"Hello\" on the Dashboard\nDescription: A custom plugin to showcase WordPress Blueprints\nVersion: 1.0\nAuthor: WordPress Contributors\n*/\n\nfunction my_custom_plugin() {\n    echo '<h1>Hello from My Custom Plugin!</h1>';\n}\n\nadd_action('admin_notices', 'my_custom_plugin');"
		},
		{
			"step": "activatePlugin",
			"pluginPath": "hello-from-the-dashboard/plugin.php"
		}
	]
}
最後に、ユーザーを管理者としてログインさせます。これは、login ステップのショートカットで実行できます。
{
	"login": true,
	"steps": {
		// ...
	}
}
完全なブループリントは次のとおりです。
{
	"$schema": "https://playground.wordpress.net/blueprint-schema.json",
	"login": true,
	"siteOptions": {
		"blogname": "私の最初のブループリント"
	},
	"steps": [
		{
			"step": "installTheme",
			"themeData": {
				"resource": "wordpress.org/themes",
				"slug": "adventurer"
			}
		},
		{
			"step": "installPlugin",
			"pluginData": {
				"resource": "wordpress.org/plugins",
				"slug": "hello-dolly"
			}
		},
		{
			"step": "mkdir",
			"path": "/wordpress/wp-content/plugins/hello-from-the-dashboard"
		},
		{
			"step": "writeFile",
			"path": "/wordpress/wp-content/plugins/hello-from-the-dashboard/plugin.php",
			"data": "<?php\n/*\nPlugin Name: \"Hello\" on the Dashboard\nDescription: A custom plugin to showcase WordPress Blueprints\nVersion: 1.0\nAuthor: WordPress Contributors\n*/\n\nfunction my_custom_plugin() {\n    echo '<h1>Hello from My Custom Plugin!</h1>';\n}\n\nadd_action('admin_notices', 'my_custom_plugin');"
		},
		{
			"step": "activatePlugin",
			"pluginPath": "hello-from-the-dashboard/plugin.php"
		}
	]
}
ダッシュボードに移動すると、次のようになります。
プラグインを作成して圧縮する
PHP ファイルをJSONでエンコードすると、簡単にテストできますが、読みにくく不便です。代わりに、プラグインコードを圧縮したファイルを作成し、そのZIPファイルをinstallPluginステップのresourceとして使用してインストールします(URLのパスは GitHub リポジトリのパスと一致している必要があります)。
{
	"$schema": "https://playground.wordpress.net/blueprint-schema.json",
	"login": true,
	"siteOptions": {
		"blogname": "私の最初のブループリント"
	},
	"steps": [
		{
			"step": "installTheme",
			"themeData": {
				"resource": "wordpress.org/themes",
				"slug": "adventurer"
			}
		},
		{
			"step": "installPlugin",
			"pluginData": {
				"resource": "wordpress.org/plugins",
				"slug": "hello-dolly"
			}
		},
		{
			"step": "installPlugin",
			"pluginData": {
				"resource": "url",
				"url": "https://raw.githubusercontent.com/wordpress/blueprints/trunk/docs/assets/hello-from-the-dashboard.zip"
			}
		}
	]
}
短縮構文を使用すると、ブループリントをさらに短縮できます。
{
	"$schema": "https://playground.wordpress.net/blueprint-schema.json",
	"login": true,
	"siteOptions": {
		"blogname": "私の最初のブループリント"
	},
	"plugins": ["hello-dolly", "https://raw.githubusercontent.com/wordpress/blueprints/trunk/docs/assets/hello-from-the-dashboard.zip"],
	"steps": [
		{
			"step": "installTheme",
			"themeData": {
				"resource": "wordpress.org/themes",
				"slug": "adventurer"
			}
		}
	]
}
6. サイトコンテンツを変更する
最後に、サイトのデフォルトコンテンツを削除し、WordPress エクスポート ファイル (WXR) から新しいコンテンツをインポートします。
古いコンテンツを削除する
デフォルトのコンテンツを削除するブループリントのステップはありませんが、PHP コードのスニペットを使用してそれを実行できます。
<?php
require '/wordpress/wp-load.php';

// Delete all posts and pages
$posts = get_posts(array(
    'numberposts' => -1,
    'post_type' => array('post', 'page'),
    'post_status' => 'any'
));

foreach ($posts as $post) {
    wp_delete_post($post->ID, true);
}
サイトのセットアップ中にそのコードを実行するには、runPHP ステップ を使用します。
{
	// ...
	"steps": [
		// ...
		{
			"step": "runPHP",
			"code": "<?php\nrequire '/wordpress/wp-load.php';\n\n$posts = get_posts(array(\n    'numberposts' => -1,\n    'post_type' => array('post', 'page'),\n    'post_status' => 'any'\n));\n\nforeach ($posts as $post) {\n    wp_delete_post($post->ID, true);\n}"
		}
	]
}
新しいコンテンツをインポートする
importWxr ステップ を使用して、WordPress テーマのテストに役立つ WordPress エクスポート (WXR) ファイルをインポートしましょう。このファイルは WordPress/theme-test-data リポジトリにあり、raw.githubusercontent.com アドレス https://raw.githubusercontent.com/WordPress/theme-test-data/master/themeunittestdata.wordpress.xml からアクセスできます。
最終的なブループリントは次のようになります。
{
	"$schema": "https://playground.wordpress.net/blueprint-schema.json",
	"login": true,
	"siteOptions": {
		"blogname": "私の最初のブループリント"
	},
	"plugins": ["hello-dolly", "https://raw.githubusercontent.com/wordpress/blueprints/trunk/docs/assets/hello-from-the-dashboard.zip"],
	"steps": [
		{
			"step": "installTheme",
			"themeData": {
				"resource": "wordpress.org/themes",
				"slug": "adventurer"
			}
		},
		{
			"step": "runPHP",
			"code": "<?php\nrequire '/wordpress/wp-load.php';\n\n$posts = get_posts(array(\n    'numberposts' => -1,\n    'post_type' => array('post', 'page'),\n    'post_status' => 'any'\n));\n\nforeach ($posts as $post) {\n    wp_delete_post($post->ID, true);\n}"
		},
		{
			"step": "importWxr",
			"file": {
				"resource": "url",
				"url": "https://raw.githubusercontent.com/WordPress/theme-test-data/master/themeunittestdata.wordpress.xml"
			}
		}
	]
}
これで完了です。最初のブループリントの作成、おめでとうございます!🥳