The setup wizard
After creating a site, its view shows the Initial setup checklist. It runs itself: when the clone finishes, the install and the build start on their own and run to the end, so a site you walked away from is ready to work on when you come back. The buttons are there for when something fails, or when you stopped the chain yourself.
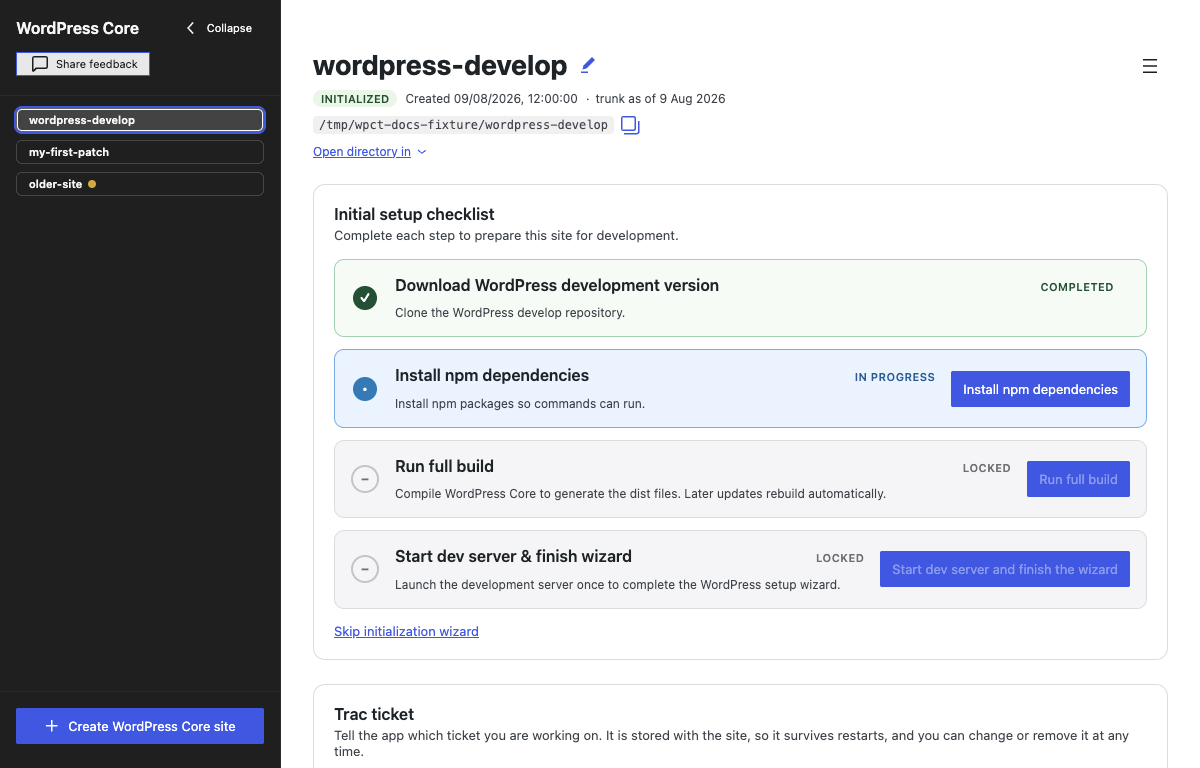
The four steps
1. Download the project
The clone of the project's repository that started when you created the site. It runs on its own; while it is in progress the checklist reads "Cloning the repository… the next step unlocks when it finishes." and every later step stays locked.
2. Install npm dependencies
npm install, run on the Node.js runtime bundled with the app — no system Node or npm is needed. It starts by itself when the clone ends, and the terminal says so: Setting this site up — running npm install…
If it fails, the chain stops there and the button changes to Retry npm install; a leftover node_modules folder from a failed run does not count as completed. Once installed, the button reads Dependencies installed and stays disabled. If you later add a dependency to package.json, run npm install yourself in the Terminal.
3. Run full build
Runs the project's full build and generates the files the dev server serves. A Core site compiles src/ into build/; a Gutenberg site builds the plugin's packages. This is the longest step after the clone, and it follows the install without asking.
You never run it manually unless something failed: trunk updates and applied patches or pull requests rebuild on their own, and while the build watch is running your edits are compiled as you save them.
4. Start dev server & finish wizard
Click Start dev server and finish the wizard to launch the WordPress dev server for the first time. This completes the checklist and permanently replaces it with the compact action bar described below. The server URL, and a wp-admin link beside it, appear next to the button once it is up — see Running the site. On a Gutenberg site the server starts on the build step 3 just produced, without the build watch; start that yourself when you want your edits compiled on save.
Stopping the chain
Press Ctrl+C in the Terminal to stop setup, including a running npm install. The terminal says where you stand — Setup stopped. The remaining steps are in the checklist above — run them whenever you are ready — and the checklist buttons take over from there. The chain names its other endings too: setup complete, the install failed, or the build failed with dependencies already installed.
Step states
Each step carries a state label:
- Completed — done, marked with a green check.
- In progress — this step is running right now.
- Ready — the next step to do, waiting on you rather than working. The distinction matters: a step that said "In progress" while nothing was installing invited you to wait instead of to click.
- Pending — ready but waiting for you to reach it.
- Locked — its prerequisites are not met yet; the button is disabled.
The step to act on is also ringed in amber and scrolls itself into view, and is announced to screen readers as Next step: …. The ring carries no label of its own — the step's own status text names it. It moves when the step it points at is done, not on a timer.
Steps also lock temporarily while a trunk update is running, since the update owns the working tree during that time.
Skipping the wizard
Below the checklist is a Skip initialization wizard link. Clicking it hides the checklist for this site, for good, and shows the compact action bar instead: the dev server start/stop button, the build watch button, and Review & submit changes. While the server is running, the site URL, wp-admin and DB inspect (Adminer) appear on a row below it.
Skipping does not run any of the steps for you. If the dependencies were never installed or the build never ran, the dev server will not have anything to serve, so only skip on a site you know is already set up (for example, a wordpress-develop or gutenberg checkout you prepared outside the app). For everything else, finishing step 4 gets you to the same action bar with the work actually done.